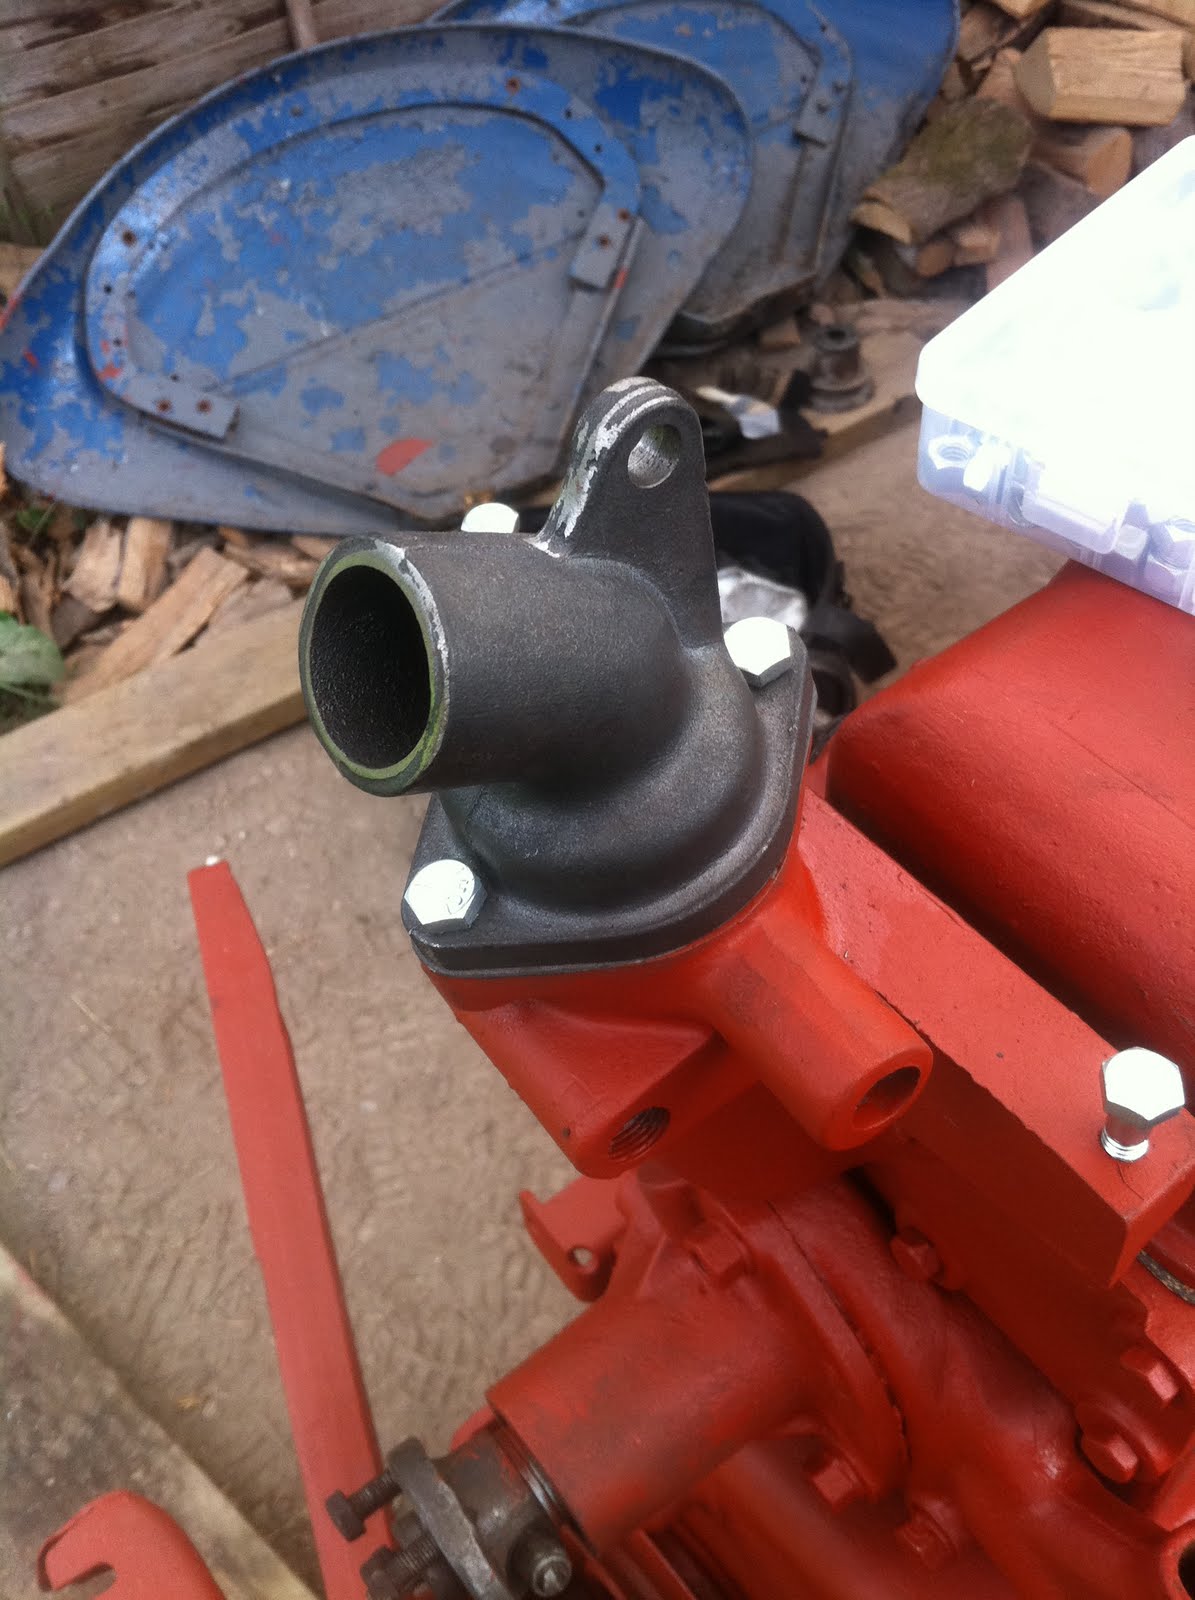
I have ordered the '7558' fuel line from agriline, but I am concerned it isn't the correct pipe.
TE20 Fuel components
It doesn't seem to have the correct end. However I can't find the correct pipe anywhere!
It can be seen in the below, 'award winning' TEF20
Fergie TEF20 fuel system
It has the correct pipe coming out of the pump on the left, then connecting to a flexible pipe into the left fuel filter.
You can see in the below photograph a TEF with the pipe that looks like it is from Agriline- so I am confused as to when this pipe changed etc. You can see it is connected to the top of the pump as opposed to the left hand side. Am I missing the obvious here?
PloughMyField photos
So will see what happens- but not sure about what has been ordered...
Monday, 27 June 2011
Sunday, 26 June 2011
what next...
I forgot my 'what next' bit, in the excitement of squeezing lemon, lime and strawberries and mint into my drink!
I have to now get the dashboard and dash structure in place. This holds the fuel filters and the throttle connections. It also allows the connection of the fuel and auxiliary fuel tanks. There are some pipes that I need, and a part that I am desperate for- the aux fuel tank bracket!! I can get the tractor running without the ki-gass, as long as fuel, cooling and air are all working and in place. We are still nervous of the clutch- so we will be looking to test the starting on the axle stands.
I will also need to wrestle with the wiring loom and electrics!
So this coming week, the plan is to get the dash and dash structure cleaned and primed ready for reconnection. Then I can get to work on getting all the key bits hooked up for the first start of the tractor.
Look at the state of Joseph Smith- tractor engineer/border terrier after all the excitement and sun!

Brakes, cooling and fuel system!
All in one day!
Fueled by hot sun, a pasty for breakfast and Pimms, we have achieved a lot today!
To start with, while I was lying in bed, Dan had got to work rebuilding the brakes. Both rebuilds went well and all parts went back together nicely. Other than the bit where the pliers on one of the springs slipped and hit Dan in the forehead! His usual genius showed through and he created a wire loop, that he used to stretch the spring easily. Fantastic! A good tip here actually! - maybe the first one :)
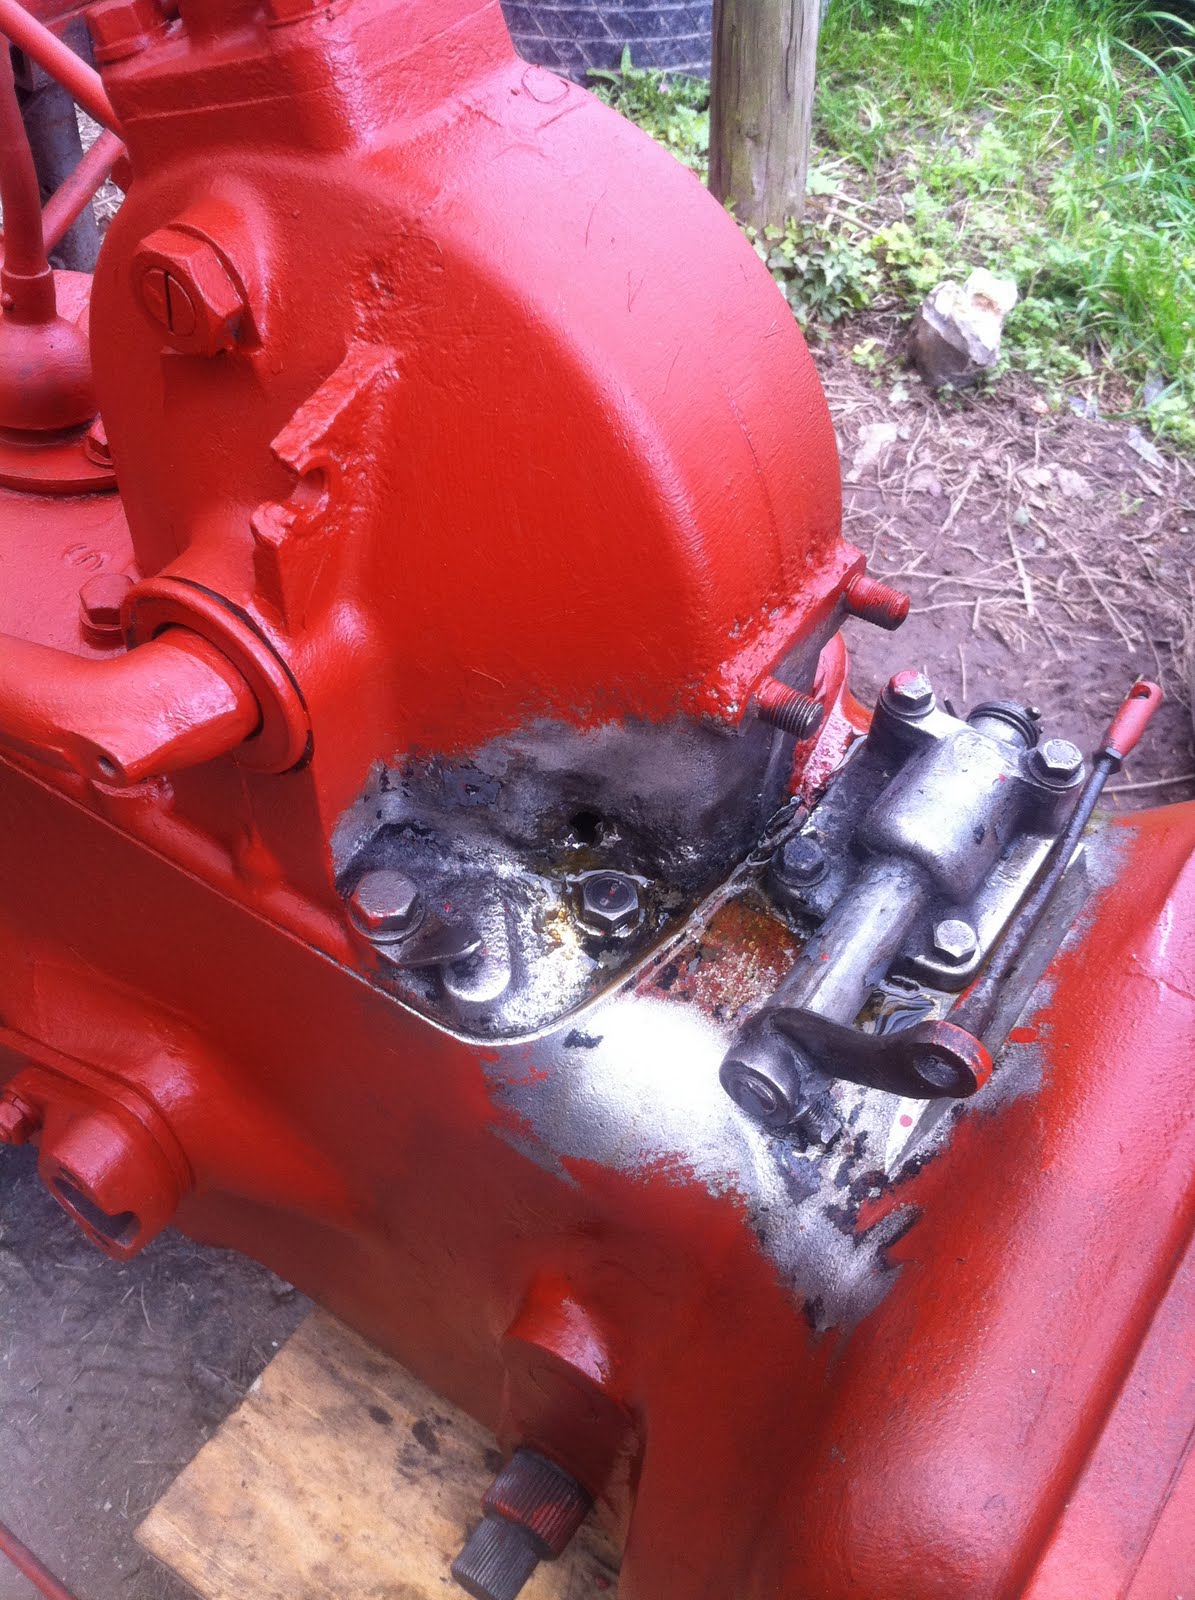
While Dan was finishing off the brakes, I got to work attaching the cleaned up manifold and venturi assembly. This went on easily. When I was taking it apart I was worried there was an order to this. As long as the exhaust is in place, the manifold went on nicely. I also now understand the ki-gass connection point - above the heater coil. I inserted and tightened up the new coil so everything is in place.
I won the new cross shaft on ebay, and can't wait to get it on so I can connect the throttle linkage!
As we were testing the brakes, I also tested the connection of the new radiator. This has a slight issue- I have replaced the whole front end of the cooling system- and the connection between the top f the radiator and the thermostat housing is not quite lined up, unless I lift the radiator up about an inch- which means the bottom bolts barely reach the base connection. The rubber hose goes on fine, it's just not a nice fit as I had hoped. The breather pipe is also fitted to the top of the rocker cover. The old pipes tend to try and kink at every opportunity, so I heated it with the blow torch.

Below you can see the radiator from the front. It's starting to look like a proper tractor!

I also got a new set of jubilee clips from Agriline which look, and operate nicely. Another tip here - again from Dan :) When you put the jubilee clips on - make sure you check the direction and access to the bolt. It makes it a lot easier to tighten and take off if you give it some forethought. In the photo below, you can see what I mean by the top hose doesn't quite fit properly.
You will also notice that there is no cowl on the radiator! It is relatively easy to get new radiators, however getting a cowl is a nightmare. I have managed to find one in Ireland, and hopefully it will be here by next week! It won't effect the first run and testing of the engine- but I will get it on, before I take the first drive.
I have also seen, a later fit to the tractor and additional part to the bonnet that protects the driver from the spinning fan. I am considering getting these- although I don't want it to look rubbish in the search for safety!

I have taken the below photograph to show how nice the set spring came up, and the completed brake assembly. We do have a minor issue. The brake pedal on the left hand side is seized to the linkage, we hoped that we wouldn't have to adjust it- but it interferes with the new/original battery box. I have sprayed it and am hoping to adjust it down, in line with the right hand side- as long as I can get a socket on the worn nut.
As well as a cowl, the guy in Ireland had the original Lucas battery covers for sale. I couldn't resist and have ordered one to go over the batter once it is installed. They look very cool, and had the original stamps and Lucas names on the top! Please, if you are considering restoring a TEF, do not underestimate the cost. Also, even as a fairly practical adult- I'm still attracted to shiny things and bling! I have already seen sticker sets and other bling-age for some of the connections and linkage!

Once the brakes were tested- which is three tests... Left pedal, left wheel- right pedal, right wheel and foot brake - both wheels, we decided to remove the blocks and put on the front axle stands. This will give me a chance to clean and prime the underside of the tractor. This went well, and has revealed a whole load of paint stripping, grinding and priming that is required. I am also considering removing the sump and cleaning it out- in fact, i'm definitely going to do it..
You can see the radiator overflow (?) pipe hanging down the side- I have now tucked this behind the inside of the radiator, so it doesn't get caught by the fan. Dan has also tajen the dynamo bracket to work, to grind of the extra part bodged on by the previous owner. It still will be gash- and IO am looking for a replacement original part. We had a laugh at the terrible quality of welding of the part and that Dan's friend Andy - who is a stickler for quality would just throw it away, in disgust!
I must ask Dan, to teach me how to weld!

Dan went, as he had an appointment with the cinema. He also goes through boots at an alarming rate- primarily because he works hard and on his feet all day. I have decided to order him a pair of Oakley Standard Issue assault boots- as I love them, but it would be good to see how they really are under proper stress!
Back to the tractor! I put the clutch pedal back on. It wasn't as bad as I thought, and just loosening the foot-peg bolts and shifting the radius rod out a cm, allowed me to squeeze the pedal back in place. This will need to be adjusted, but at least it is on the spline. I also have some new rubbers for the track rods, which will go on after the grey spray!
Dan tried to trick me with a question regarding why Harry Ferguson chose grey for the Little Grey Fergie. Fortunately I had been doing my research the night before! I had discovered that Harry Ferguson sourced the paint cheaply from the Navy- battleship grey! So there is no one standard colour for Fergie's- they were painted with the paint supplied by the military.
Quite cool- but I need to start looking for the right paint pretty soon!

After a break and some Pimms in the sun, I started feeling edgy- edgy that I wasn't working on the tractor!!!
I decided to plan the fuel pipes and see if I had what I needed. My plan was to lay them out on the ground, then compare against the fuel lines in the parts manual. The tractor had been butchered, before I got it - so I am constantly looking at buying new parts to get it back to original - how ironic!
I laid out what I have and have bought on the grass:

I felt confident, and lying in the sun isn't my thing- so I got to work!
This took some time, but I attached the fuel pump to the body and made sure the new gasket was in place and scratched around for some temporary bolts- I need some help here - what is the correct fixing for the pump to the body??
I managed to secure it, and started by connecting the pipes that connect the injectors. After some fumbling, I found the easiest way, was to take all the injectors out and loosely connect them to the mani piping- then with some bending and swearing I got all the injectors connected to the body. I then bolted the injectors on properly, and tighten the pipe nuts. I have previous cleaned up the injectors- and I have added new copper washers where required.
Once on, I then laid out the pump- injector pipes. The easiest way seemed to be to connect the pipe to the top of the injector, then bending/swearing line it up with the pump connection. Then screw it on, and tighten with the spanner. Some re-alignment was required to make sure none of the lines were touching, I then connected the line that connects up to the fuel tank- this is new and wasn't on the tractor when I got it!
After all the injectors were connected I lined up the main fuel line to the filters- you can see I had replaced the original connection with the flexible fuel line. DISASTER! Obviously I was getting cocky, and the pipe just sheared- I knew it was rusty, but I hoped it would be ok. You can see just under the bracket where the pipe has broken. I need to search for a replacement! :(
I have left it on for now. I finished off with the tube that goes from the pump to the inlet manifold- I have no ide what this is for- i guess it;s either air tio the pump or fuel to the inlet?? This took a bit of heat and reshaping to get it to run under the injector pipes- but I got it there. You MUST connect this to the pump first- as once it os one, it is easy to flex and line up with the manifold.
The results are below- i'm very happy- other than the broken bit.

I'm a curious person, and couldn't help unscrewing the plate on the pump- I also unscrewed the oil runoff- which loads of milky oil ran out of! The springs and pump inside look in great condition. I gave it all a good spray with wd40. I also read the plate which says the pump should be filled with engine oil during install. I must remember that there are loads of different points that need to be refilled with oil!

So, its been a good day- or has it? I won't know until we try to start it.
An extra bonus was that last night I was reading the ploughmyfield blog and I now understand that my tractor is missing all of the decompression parts. The bloke who I won the cross shaft off told me he has combined two tractors into one, I asked him about the decompression- and he has the shaft and front lever! YES! He is sending it with the cross shaft on Monday. That is great news...
right..
Pimms!
Fueled by hot sun, a pasty for breakfast and Pimms, we have achieved a lot today!
To start with, while I was lying in bed, Dan had got to work rebuilding the brakes. Both rebuilds went well and all parts went back together nicely. Other than the bit where the pliers on one of the springs slipped and hit Dan in the forehead! His usual genius showed through and he created a wire loop, that he used to stretch the spring easily. Fantastic! A good tip here actually! - maybe the first one :)
While Dan was finishing off the brakes, I got to work attaching the cleaned up manifold and venturi assembly. This went on easily. When I was taking it apart I was worried there was an order to this. As long as the exhaust is in place, the manifold went on nicely. I also now understand the ki-gass connection point - above the heater coil. I inserted and tightened up the new coil so everything is in place.
I won the new cross shaft on ebay, and can't wait to get it on so I can connect the throttle linkage!
As we were testing the brakes, I also tested the connection of the new radiator. This has a slight issue- I have replaced the whole front end of the cooling system- and the connection between the top f the radiator and the thermostat housing is not quite lined up, unless I lift the radiator up about an inch- which means the bottom bolts barely reach the base connection. The rubber hose goes on fine, it's just not a nice fit as I had hoped. The breather pipe is also fitted to the top of the rocker cover. The old pipes tend to try and kink at every opportunity, so I heated it with the blow torch.

Below you can see the radiator from the front. It's starting to look like a proper tractor!

I also got a new set of jubilee clips from Agriline which look, and operate nicely. Another tip here - again from Dan :) When you put the jubilee clips on - make sure you check the direction and access to the bolt. It makes it a lot easier to tighten and take off if you give it some forethought. In the photo below, you can see what I mean by the top hose doesn't quite fit properly.
You will also notice that there is no cowl on the radiator! It is relatively easy to get new radiators, however getting a cowl is a nightmare. I have managed to find one in Ireland, and hopefully it will be here by next week! It won't effect the first run and testing of the engine- but I will get it on, before I take the first drive.
I have also seen, a later fit to the tractor and additional part to the bonnet that protects the driver from the spinning fan. I am considering getting these- although I don't want it to look rubbish in the search for safety!

I have taken the below photograph to show how nice the set spring came up, and the completed brake assembly. We do have a minor issue. The brake pedal on the left hand side is seized to the linkage, we hoped that we wouldn't have to adjust it- but it interferes with the new/original battery box. I have sprayed it and am hoping to adjust it down, in line with the right hand side- as long as I can get a socket on the worn nut.
As well as a cowl, the guy in Ireland had the original Lucas battery covers for sale. I couldn't resist and have ordered one to go over the batter once it is installed. They look very cool, and had the original stamps and Lucas names on the top! Please, if you are considering restoring a TEF, do not underestimate the cost. Also, even as a fairly practical adult- I'm still attracted to shiny things and bling! I have already seen sticker sets and other bling-age for some of the connections and linkage!

Once the brakes were tested- which is three tests... Left pedal, left wheel- right pedal, right wheel and foot brake - both wheels, we decided to remove the blocks and put on the front axle stands. This will give me a chance to clean and prime the underside of the tractor. This went well, and has revealed a whole load of paint stripping, grinding and priming that is required. I am also considering removing the sump and cleaning it out- in fact, i'm definitely going to do it..
You can see the radiator overflow (?) pipe hanging down the side- I have now tucked this behind the inside of the radiator, so it doesn't get caught by the fan. Dan has also tajen the dynamo bracket to work, to grind of the extra part bodged on by the previous owner. It still will be gash- and IO am looking for a replacement original part. We had a laugh at the terrible quality of welding of the part and that Dan's friend Andy - who is a stickler for quality would just throw it away, in disgust!
I must ask Dan, to teach me how to weld!

Dan went, as he had an appointment with the cinema. He also goes through boots at an alarming rate- primarily because he works hard and on his feet all day. I have decided to order him a pair of Oakley Standard Issue assault boots- as I love them, but it would be good to see how they really are under proper stress!
Back to the tractor! I put the clutch pedal back on. It wasn't as bad as I thought, and just loosening the foot-peg bolts and shifting the radius rod out a cm, allowed me to squeeze the pedal back in place. This will need to be adjusted, but at least it is on the spline. I also have some new rubbers for the track rods, which will go on after the grey spray!
Dan tried to trick me with a question regarding why Harry Ferguson chose grey for the Little Grey Fergie. Fortunately I had been doing my research the night before! I had discovered that Harry Ferguson sourced the paint cheaply from the Navy- battleship grey! So there is no one standard colour for Fergie's- they were painted with the paint supplied by the military.
Quite cool- but I need to start looking for the right paint pretty soon!

After a break and some Pimms in the sun, I started feeling edgy- edgy that I wasn't working on the tractor!!!
I decided to plan the fuel pipes and see if I had what I needed. My plan was to lay them out on the ground, then compare against the fuel lines in the parts manual. The tractor had been butchered, before I got it - so I am constantly looking at buying new parts to get it back to original - how ironic!
I laid out what I have and have bought on the grass:

I felt confident, and lying in the sun isn't my thing- so I got to work!
This took some time, but I attached the fuel pump to the body and made sure the new gasket was in place and scratched around for some temporary bolts- I need some help here - what is the correct fixing for the pump to the body??
I managed to secure it, and started by connecting the pipes that connect the injectors. After some fumbling, I found the easiest way, was to take all the injectors out and loosely connect them to the mani piping- then with some bending and swearing I got all the injectors connected to the body. I then bolted the injectors on properly, and tighten the pipe nuts. I have previous cleaned up the injectors- and I have added new copper washers where required.
Once on, I then laid out the pump- injector pipes. The easiest way seemed to be to connect the pipe to the top of the injector, then bending/swearing line it up with the pump connection. Then screw it on, and tighten with the spanner. Some re-alignment was required to make sure none of the lines were touching, I then connected the line that connects up to the fuel tank- this is new and wasn't on the tractor when I got it!
After all the injectors were connected I lined up the main fuel line to the filters- you can see I had replaced the original connection with the flexible fuel line. DISASTER! Obviously I was getting cocky, and the pipe just sheared- I knew it was rusty, but I hoped it would be ok. You can see just under the bracket where the pipe has broken. I need to search for a replacement! :(
I have left it on for now. I finished off with the tube that goes from the pump to the inlet manifold- I have no ide what this is for- i guess it;s either air tio the pump or fuel to the inlet?? This took a bit of heat and reshaping to get it to run under the injector pipes- but I got it there. You MUST connect this to the pump first- as once it os one, it is easy to flex and line up with the manifold.
The results are below- i'm very happy- other than the broken bit.

I'm a curious person, and couldn't help unscrewing the plate on the pump- I also unscrewed the oil runoff- which loads of milky oil ran out of! The springs and pump inside look in great condition. I gave it all a good spray with wd40. I also read the plate which says the pump should be filled with engine oil during install. I must remember that there are loads of different points that need to be refilled with oil!

So, its been a good day- or has it? I won't know until we try to start it.
An extra bonus was that last night I was reading the ploughmyfield blog and I now understand that my tractor is missing all of the decompression parts. The bloke who I won the cross shaft off told me he has combined two tractors into one, I asked him about the decompression- and he has the shaft and front lever! YES! He is sending it with the cross shaft on Monday. That is great news...
right..
Pimms!
Saturday, 25 June 2011
Ferguson TEF20 restoration: Godzilla!
Ferguson TEF20 restoration: Godzilla!: "So I got off to an early start today. The plan was to get the front end sorted, and start rebuilding the steering linkages. The weather has ..."
Godzilla!
So I got off to an early start today. The plan was to get the front end sorted, and start rebuilding the steering linkages. The weather has been predicted to be 28 degrees this weekend, but early morning was quite cool- so good working conditions.. I, as always start off with a few easy jobs, just to get into it.
I started attaching the engine breather- no worries, just made sure I had the new gasket in there. I will be painting this up, as it will get sprayed grey as part of the spraying process- which is coming soon!

I then decided to complete the front end and get it cleaned up properly, I needed to take off the wheels. The bolts were stuck solid, so I used my leverage bar- that I now call Godzilla! I also have son of Godzilla - who I will show you in due course! Godzilla made mince meat of the seized nuts and the wheels were off in no time. It's important you do this, as I realised the wheels were badly rusted to the hubs and had to whack them to get them off even after I had removed the wheel nuts.
It also gives a lot better access for the cleaning up process:

I completed the same process both sides, and spend a good hour on each axle with the grinder. I pretty much got all the paint and rust off- however due to the cast space it is quite difficult to get into the recesses. I use a fl;at blade screw driver and wire brush to finish off. Once finished I painted up the back side of the axle and let it dry before connecting it to the center axle. I have some nice uniform new axle bolts to use- and they look awesome when on.
I also experimented with different track widths but finished on the below configuration. You can also see that the steering is slightly off- this was tricky to get right. When you pull the steering linkage all the way back, it seems to disconnect from the rack. Meaning it's quite difficult to get lined up again. This took a good 20 minutes of fiddling to get lined up. They are pretty close, but I will make some final adjustments on the track rod end when I come to bolt them together. Once the axles are mounted I can easily finish off the painting.
There is also a point that most of the grease nipples are already full of paint. My plan is to replace them all, after the grey spray! I have a full box of imperial nipples ready to go on and then I can grease up all required parts.

I was well ahead of schedule- a good focused session of 4 hours completed the above work. The grinding threshold is about 4 hours before I just can't take anymore- but I am getting better.
So a nice cup of Yorkshire tea and a chat with my friend Marcus who dropped by and I was raring to go for some more tractor action. Marcus looked quite envious even though he won't admit it and prefers to take the piss out of my restoration by referring to it as Tractor Sex. He was off on his motorbike to a lifeboat charity event.
So I turned my attention to some of the parts that need preparation.
I started with the seat. It was completely rotten- I will be ordering a new seat pan tonight. I did manage to salvage the spring though. Dan had arrived and helped splitting the seized nut with a hammer and chisel. This freed the spring from the seat, then I grinded it, primed it and bolted it on to the tractor.
You can see in the below picture- the next parts I want to focus on are the beaten dashboard parts. I have removed all the dials and key etc from the existing dashboard.

I soon got a bit bored of grinding, I have however cleaned up the whole of the front of the dashboard, but still need to complete the back of it- It also has a big rusted hole behind the ki-gass instruction plate. I also laid out a few other parts that need completing! I decided I would do the drawbar as it was the least 'technical', I primed this up so it is ready for spraying and re-attachment.

A great piece of news, is that I did more testing of the ki-gass pump.... and got it working!!!! YES!!!!
Cleaning it up and fiddling around I released the plunger and have done dome tests and it does build up air pressure in the output pipe! This is fantastic news- so I have the tank, and need to check I have the copper tubes- I may need to order these, but it does mean I can get ki-gass working!! I was quite worried about this, and to get the pump working was a great feeling.

Once I had cleaned up the dash, the paint on the front end had dried- so I wanted to get the track rods connected properly and the foot pegs put in place and primed up. In hindsight this is a massive error! Later on I realised that to get the clutch pedal on, you need the track rods off. So at some point I will need to remove the left tract rod to get the clutch pedal on properly- very annoying. Either way, I copper greased the rod ends and they slipped in and I pinned them with the foot pedals.
It is actually starting to look quite cool. Some minor adjustments to the tracking is still required- which I will complete later. I have also started positioning my new bolts where required. Various nuts and bolts have been missing from various parts of the tractor and my new ones are going in nicely, still not recognising C or F threads first time though! :(
You can see below, that I have also reconnected the starter shaft and spring.

Below is a picture of the rods and foot-peg connected and no chance of getting the pedal on! When the paint has dried properly, I will whip the foot-peg out and see if I can pop out the ball joint and push the pedal on- with minimum of fuss, hopefully- or an hour of struggling.. more likely!

It was time for another cup of tea and a chat with Dan- he was buying a new car- sounded good.
We discussed what we were going to do next and the plan was to get the starter motor, dynamo and fan belt on to the tractor. We are going to get it running before we do the grey paint spray- so we can confirm all the change we have made are operational. Especially the clutch- if we have to split the tractor again, we don't want to ruin the grey paint. So the focus now is to get the fuel, air and cooling systems back in place. We go the starter motor on, without too much difficulty, other than a nut witch is ridiculously difficult to tighten up. The dynamo is now on the bracket but we hit some complexities caused by the previous owner!

When I got the tractor, there was an unsightly alternator on it. To get the alternator on, the previous owner had butchered the bracket with new drill holes and what I didn't realised he had welded an extension part on to the dynamo bracket. We only realised this when we were trying to fit the dynamo. We are going to hacksaw this off tomorrow and then fit the dynamo properly and get the fan belt tightened correctly. You can see below the extra part that has been welded on to the bracket.
You can also just make out the seat spring back on, nice and orange!

Here is my summer picture out of the log shed! Looking forward to do ing nothing in the 28 degree heat tomorrow!

The final image below, is showing the starter and dynamo attached. The started was a fiddle to get the connection link to sit correctly. It seems to approach at the wrong angle. We managed to sort this out by shortening the link by cranking the connection to its shortest setting. I have tested the starter from the gear stick and it definitely engages the solenoid- so it seems all good.

The plan for tomorrow, is for Dan to start early and rebuild the brakes, whilst I concentrate on reconnecting the fuel system. There are definitely going to be parts of piping that are missing, so I need to work out exactly what to start ordering!
In other news, I have won a new hydraulic lever and the cross shaft on ebay! I snook in at the last minute... So as soon as I get them, they will be going on!
Right, to order the seat pan...
Thursday, 23 June 2011
for the fans!
I just did a quick session on the tractor this evening! I don't want a hobby to turn into an obsession! mmm...
I started by checking everything over from the last painting session. I touched up the rocker cover and put in the new cork gasket. I then oiled the engine top and put the rocker cover back on and screwed it down.
As the base layer of primer is on, I am going to start reconstructing the key components in preparation for the second coat and then the grey spray. You can see in the below photo that I have also put in the manifold bolts.
![]()
I also put on the new gaskets for the manifold. I have also painted this in primer- but am worried that a special paint tpe may be required. I really like the uniformity of the paint base layer.
![]()
The quiksteel arrived in the post today. Nice and easy, it is basically a putty version of araldite. Spend a few minuted kneading it together and then it starts to warm up. I then pushed it into the hole and around the damaged area- I tried to push it back in to allow access to the bolt head. I smothed it out with my fingers and plan to sand it back at some point. I certainly has sealed up the hole and was fully hardened in around 5 minutes- very good stuff.
![]()
To finish off, I put in the thermostat for the water cooling system. A new gasket is requitred to seal around the two parts and I bolted them together with my new bolt sets which arrived today. The new bolts are brilliant, although it is difficult to know if they are exactly the right size as alot of the theads are blocked with oil and dirt. The new parts look great:
![]()
I also noticed the hole on the front right hand side of the thremostat housing- I looked at the old piece and there was a brass plug. i removed this with a major amount of leverage with a 4 foot power bar! I think the water and calcification tends to block the threads on bolts etc in the water system. So the leverage worked sweetly. I chipped off the old grey paint and cleaned up the brass plug. I really like the little touches of the exposed metal parts. I primed up the whole new piece, and it blends in nicely.
![]()
I then reconstucted the cooling fan and primed up the piece. I used the original bolts and it went together nice and easy. The fan was actually the first item I primed, so it feels good to be going back on the tractor. I have a new radiator and hose set ready to put back on- but only after the tractor has its grey fergie coat!
![]()
To finish I primed the mid section of the tractor. I checked the putty and then chipped any other paint away as well as cleaning up any excess oil. As a comment on my previous blog post, the oil can be replenished possibly with a thin grease to avoid an leaks etc. After cleaning it up, it felt good to complete for the first coat- other than the bottom of the tractor which I will only be able to do when the wheels go on.
![]()
I am still bidding on the cross shaft, and funnily enough the fuel filters have been bidded right up by a user with 0 feedback. As expected! I will keep an eye on them and see what I can get them for. I would like to get them!
I must get the front axles done! However I think I am all grinded out at the moment! I'm planning to get the front end fully completed on saturday. I am hoping soon to be progressing into some of the more technical aspects! I have also realised that the whole decompression system is missing and the lever is seized. No searches have revealed where to get these parts- and I can't seem to source new ones. So any ideas re decompression lever/rod/parts are greatly welcolmed!
I started by checking everything over from the last painting session. I touched up the rocker cover and put in the new cork gasket. I then oiled the engine top and put the rocker cover back on and screwed it down.
As the base layer of primer is on, I am going to start reconstructing the key components in preparation for the second coat and then the grey spray. You can see in the below photo that I have also put in the manifold bolts.

I also put on the new gaskets for the manifold. I have also painted this in primer- but am worried that a special paint tpe may be required. I really like the uniformity of the paint base layer.

The quiksteel arrived in the post today. Nice and easy, it is basically a putty version of araldite. Spend a few minuted kneading it together and then it starts to warm up. I then pushed it into the hole and around the damaged area- I tried to push it back in to allow access to the bolt head. I smothed it out with my fingers and plan to sand it back at some point. I certainly has sealed up the hole and was fully hardened in around 5 minutes- very good stuff.

To finish off, I put in the thermostat for the water cooling system. A new gasket is requitred to seal around the two parts and I bolted them together with my new bolt sets which arrived today. The new bolts are brilliant, although it is difficult to know if they are exactly the right size as alot of the theads are blocked with oil and dirt. The new parts look great:
I also noticed the hole on the front right hand side of the thremostat housing- I looked at the old piece and there was a brass plug. i removed this with a major amount of leverage with a 4 foot power bar! I think the water and calcification tends to block the threads on bolts etc in the water system. So the leverage worked sweetly. I chipped off the old grey paint and cleaned up the brass plug. I really like the little touches of the exposed metal parts. I primed up the whole new piece, and it blends in nicely.

I then reconstucted the cooling fan and primed up the piece. I used the original bolts and it went together nice and easy. The fan was actually the first item I primed, so it feels good to be going back on the tractor. I have a new radiator and hose set ready to put back on- but only after the tractor has its grey fergie coat!

To finish I primed the mid section of the tractor. I checked the putty and then chipped any other paint away as well as cleaning up any excess oil. As a comment on my previous blog post, the oil can be replenished possibly with a thin grease to avoid an leaks etc. After cleaning it up, it felt good to complete for the first coat- other than the bottom of the tractor which I will only be able to do when the wheels go on.

I am still bidding on the cross shaft, and funnily enough the fuel filters have been bidded right up by a user with 0 feedback. As expected! I will keep an eye on them and see what I can get them for. I would like to get them!
I must get the front axles done! However I think I am all grinded out at the moment! I'm planning to get the front end fully completed on saturday. I am hoping soon to be progressing into some of the more technical aspects! I have also realised that the whole decompression system is missing and the lever is seized. No searches have revealed where to get these parts- and I can't seem to source new ones. So any ideas re decompression lever/rod/parts are greatly welcolmed!
Wednesday, 22 June 2011
ebay finds
For any budding tractor restorer make a daily trip to ebay standard operating procedure!
After the flurry of buying loads of new stuff, i'm enjoying searching ebay for second hand parts or parts from tractors for breaking.
I'm almost tempted to try to go to some sort of agricultural car boot sale! I may need to borrow Kasha's pick up, to carry home my purchases!
The two things I am currently bidding on, primarily due to the existing parts being degraded so much are the following. I know they look bad, but with an hour of wire brushing and grinding and a dab of primer- will be as good as new! ;)
The cross shaft here looks cool, the one on my tractor has the bottom hole snapped off- so I think it is definitely a good plan to replace it.

The hydraulic lever on the tractor is moving but badly rusted and the guard has basically snapped off due to the metal rusting.

Will see how I get on- but I have realised there are some serious scammers on ebay. There is an air cleaner for sale at the moment, and I put a reasonable bid on of around £20 and a strange ebay user with 0 feedback bidded it up. I looked at all the other products the same bloke had for sale- and the same dodgy user had bidded them all up!
On principle, I don't want to buy anything off this guy- but he does have the twin fuel filters for sale! The holy grail! :) A question of principle over necessity! grrr
next ebay update to follow in about 6 days.
nearly there with the red!
All day, the blogger website hasn't allowed me to add the pictures from this morning!
I managed to take a few pictures of the first (nearly) full primer coat. The only area left is around the hole in the steering cast and the area where the oil ran down the tractor! I have spoken to Gibson at work- who is obviously a specialist on liquid steel - as he rides a KTM, and therefore used to fixing broken machines :)
He reckons the liquid steel idea will be sweet as long as I do the knead preparation properly. I can't face any work today, after yesterday's epic- but I did just go over and clean up the excess oil and brush the metal back to shiny. I'm hoping there is an easy solution to getting the oil back in there once it is all sealed up.
You can see the tractor body in the below pictures starting to look good. You can also see the dust on the rear part from cleaning up the front area before the priming. I have brushed this off this evening- so there is an even redness. Once I have coated the area around the oil leak, I am going to do a full second coat of primer- should look pretty nice!

The engine block cover has a number of aluminium plates attached, but there are so degraded, they are just metal. I have decided to paint over them and then attach new covers over the top if I can find them.

The hydraulic spring area at the back is looking a lot better with a coat of primer. At a later point, when the tractor is running, I am planning to drive it up to Meeks' metalworks and Dan has said they have the tools to get the top pin out. Then we can re-clean this up and get a nice new pin in place. Just need to get the beast running first!

I took off the rubber boots on the track rods prior to painting, and also cleaned out the grease from underneath. I received new rubber seals today- so they will look nice when they go back on. However, these finishing touches I am planning to put on after the grey spray.

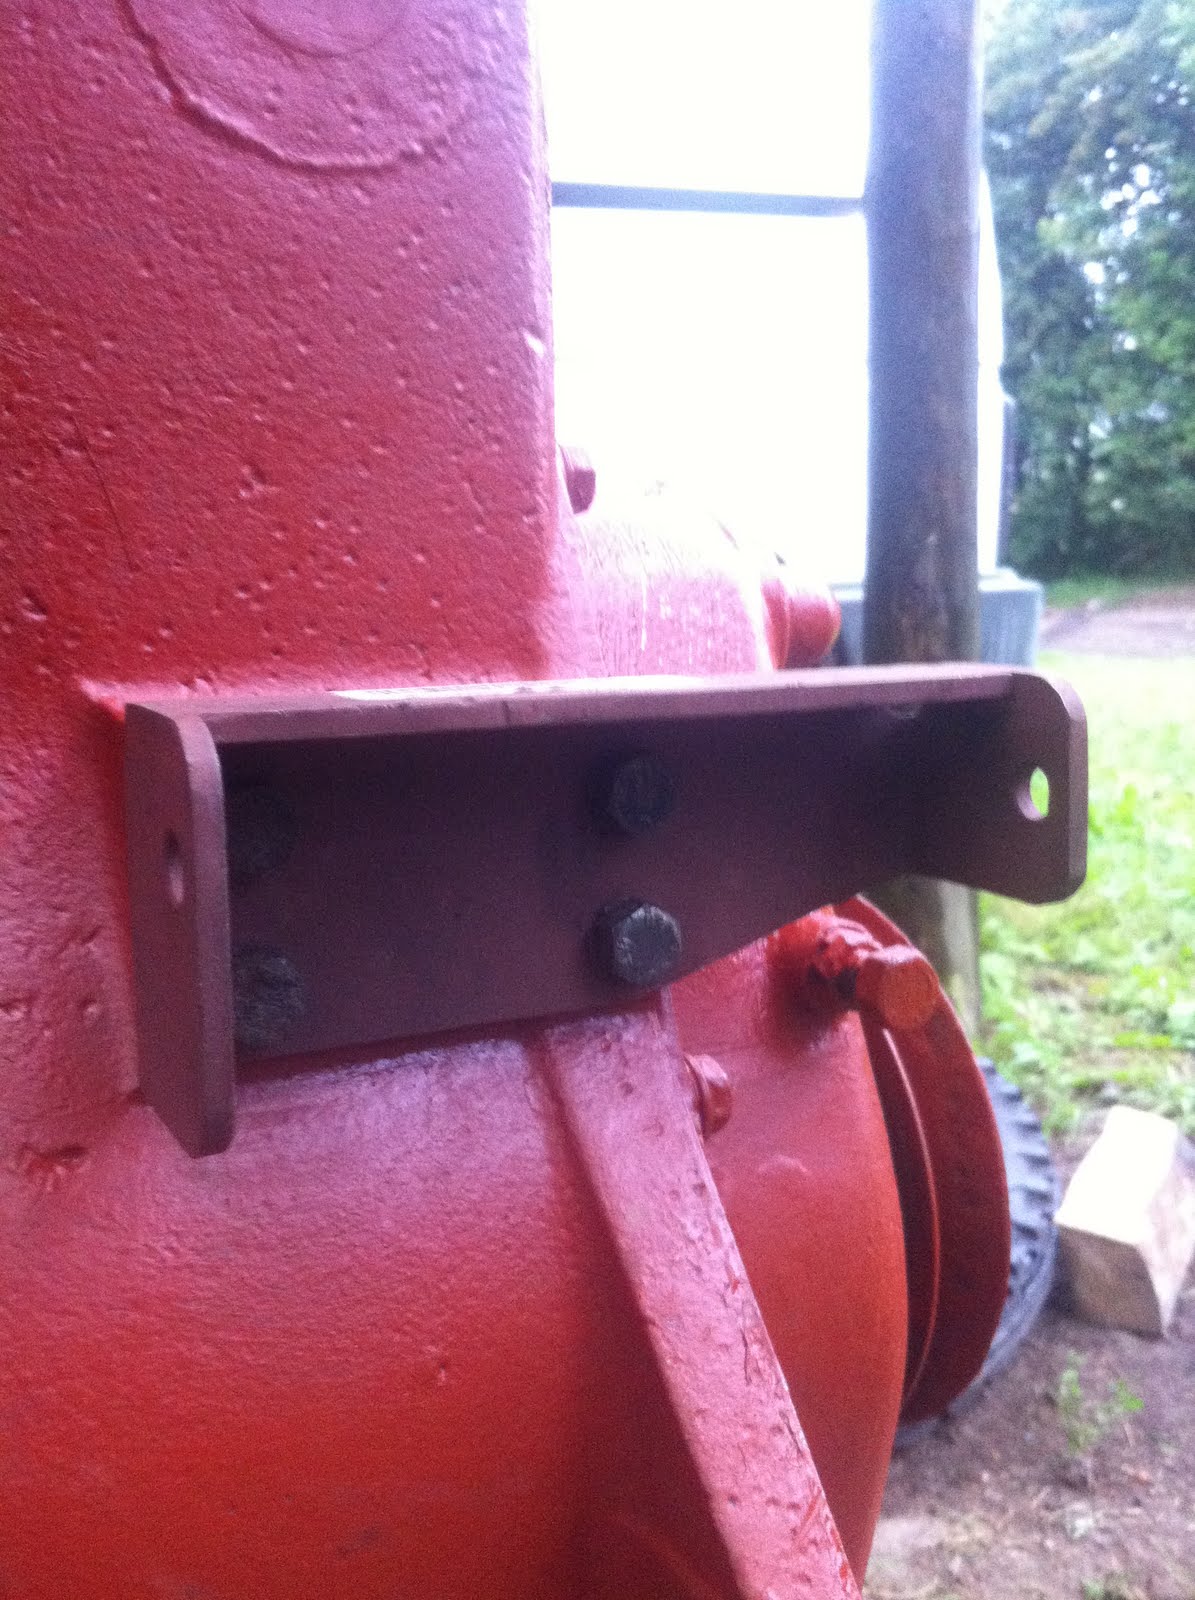
You can see on the below picture the extent of metal damage on this section. look at the drilled hole to connect to the dash area on the left- it is totally broken off the tractor body. fortunately there is enough to hole a bolt and nut, so should be ok to use when we put the tractor dash back together. The cross shaft is also damaged on the tractor, and only really noticed how damaged when I was doing the priming. I have however, found on ebay one from a breaker tractor- so am hoping to win that and replace the broken part.
So, all good progress and am feeling a lot better about the hole- now I have a plan and a potential solution.
The next set of immediate jobs are as follows:
-- Fix the hole with liquid metal and sand flush
-- Replace the tractor cross shaft and prepare and prime
-- Put in the water thermostat and top pipe piece
-- cork gasket for the rocker cover
-- Clean up the end of the front axles and disconnect the wheels
-- Prime up the axle ends and reattach with new axle bolts
-- Recoat the whole tractor in a second primer application
Once that is done, I am thinking I will probably progress on to rebuilding the dash area. This will involve the grind and prime approach and then the full reconstruction on the tractor body. I know this will be difficult as there are so many nooks and crannies in the metal work- so I think the progression rate may drop as I get these more complicated jobs completed. I will also be using the liquid metal to fix the holes in the air filter- I can then get that primed up ready for reattachment on to the dash area!
It's all moving along nicely!
Tuesday, 21 June 2011
the longest day...
...and I have made the most of it!
I have been working on the tractor all evening until about 10pm, where it started getting too dark.
I have completed preparing and priming the whole tractor!
I have finished cleaning the body of the tractor, and I also have put on all the water pump and new cast connection that connects into the radiator, with the new gasket. This was broken on the original tractor, and a part was snapped off. Which now I understand to be part of the decompression system, which is what the loose lever on the dash board is for! The painted water pump looks super-cool!
So I have added a few key parts, prepared and primed the whole tractor! Unfortunately I couldn't take any photo's as it was too dark. I'm also pretty knackered, so am going to keep this short. I will take some photos and give a more detailed description of what I have got up to tomorrow. I did manage to get a photograph of the primed water pump and new section, it can be seen below, before I painted it up:
![]()
You can see that I also put back on the front axle section, which is now as previously shown is disconnected from the wheels. I have also got new axle bolts today through the post, so it will look awesome when it is all back together. The outer axles are going to require a lot of jet washing as they are packed with mud.
So... all positive so far.
What I am not telling you is the total disaster that has ocurred. I think I may be in denial about it at the moment though. The softer aluminium metal steering column in vertain parts is badly pitted and degraded. The front section has been eaten away significantly- when I was cleaning it with the wire brush there was a puff of white dust and then a hole appeared and oil started spewing out!! There wa s alot of clean oil running out of the hole, it was dribbling. I stuck a screwdriver in to try to clean up the loose, thin metal and it ran thicker and there was oily dirt in there too.
So I have a dilemma at the moment- do I take the whole top section of the tractor and have a look inside, or try and close up the holw somehow? See the picture below.
![]()
The hole can be seen just above the bolt head, in the center of the picture.
I'm tired at the moment, and am hoping I can fill it up with metal filer then sand it back and paint it over. Although I have never done this before- can this be done on aluminium?
I'm also not sure what this oil is, or how it is replenished?? Research is required. I am thinking this type of QuickSteel product like on ebay- it seems like some sort of epoxy resin. If anyone has any thoughts/experiences with this- please message me!
QuikSteel-Instant-Metal-Repair-Weld-filler
I need to go to bed... Photos and updated story to follow in the morning...
Night's will be cutting in now- it's all downhill to winter! :)
I have been working on the tractor all evening until about 10pm, where it started getting too dark.
I have completed preparing and priming the whole tractor!
I have finished cleaning the body of the tractor, and I also have put on all the water pump and new cast connection that connects into the radiator, with the new gasket. This was broken on the original tractor, and a part was snapped off. Which now I understand to be part of the decompression system, which is what the loose lever on the dash board is for! The painted water pump looks super-cool!
So I have added a few key parts, prepared and primed the whole tractor! Unfortunately I couldn't take any photo's as it was too dark. I'm also pretty knackered, so am going to keep this short. I will take some photos and give a more detailed description of what I have got up to tomorrow. I did manage to get a photograph of the primed water pump and new section, it can be seen below, before I painted it up:

You can see that I also put back on the front axle section, which is now as previously shown is disconnected from the wheels. I have also got new axle bolts today through the post, so it will look awesome when it is all back together. The outer axles are going to require a lot of jet washing as they are packed with mud.
So... all positive so far.
What I am not telling you is the total disaster that has ocurred. I think I may be in denial about it at the moment though. The softer aluminium metal steering column in vertain parts is badly pitted and degraded. The front section has been eaten away significantly- when I was cleaning it with the wire brush there was a puff of white dust and then a hole appeared and oil started spewing out!! There wa s alot of clean oil running out of the hole, it was dribbling. I stuck a screwdriver in to try to clean up the loose, thin metal and it ran thicker and there was oily dirt in there too.
So I have a dilemma at the moment- do I take the whole top section of the tractor and have a look inside, or try and close up the holw somehow? See the picture below.

The hole can be seen just above the bolt head, in the center of the picture.
I'm tired at the moment, and am hoping I can fill it up with metal filer then sand it back and paint it over. Although I have never done this before- can this be done on aluminium?
I'm also not sure what this oil is, or how it is replenished?? Research is required. I am thinking this type of QuickSteel product like on ebay- it seems like some sort of epoxy resin. If anyone has any thoughts/experiences with this- please message me!
QuikSteel-Instant-Metal-Repair-Weld-filler
I need to go to bed... Photos and updated story to follow in the morning...
Night's will be cutting in now- it's all downhill to winter! :)
Monday, 20 June 2011
red wash
This week, i'm planning to clean up and seal the tractor body with primer.
I have figured, with a push and working for a good 6, 4 hour sessions, I can get all the tractor grinded and cleaned up, and then a base primer coat applied. Other than the sections on the wooden blocks and the axle stands this should mean the main body is sealed from any further rust etc. I have been doing parts as they have come off the tractor- but as there is nothing else to come off, now is the time to get the body completed.
I started, as always with the wire brush on the electric grinder. I now just use the makita battery grinder for the fine work parts and get it in the gaps that the larger brush can't reach. However the grinding of the engine block revealed a potentially shocking situation! In the photo below, there is a horizontal line starting to the right of the water tap across the block. Dan thinks this may be a cast mark- however I am concerned the block is cracked! :( The tractor was running, holding water and oil when we got it. The oil in the engine was also black with no water- so whatever this is- it doesn't seem to affect the engine operation. I'm hoping even if it is a crack it is not terminal...
![]()
Below you can see the fruits of around 3 hours of grinding, brushing and cleaning. You can also see that I took the water pump off. This is just three bolts into the engine block, underneath was loads of mud and gunk, so it was definately worth it. It gives much better access to the timing cover and allows the cleaning of the back of the water pump. I also took the oportunity to prime the pump.
![]()
The first priming coat took around an hour. The plan is that once the full first coat is done, I will go over the whole tractor with a second coat. I am applying the primer quite thinly, but making sure it has a good coverage. You can see the engine block coat below. I am also dabbing any areas on the previous coat that have thinned through due to more work going on.
![]()
My painting technique is actually quite funny. More dabbing than brushing! The trick with painting is paint an area looking at it from one direction. Then dab all the key parts to make sure the paint gets ito all the nooks and crannies. Then change position and look at the same area from a different direction, as usually there are loads of bits that haven't took the paint. more dabbing and it's all sorted!
Another opportunity to put a new bit on! Quite minor, but still exciting.. well exciting for me! Maybe not so much for the reader! One of the issues when I got the tractor, was that a alternator had been gashed on. The preious owner had re-drilled the dynamo braclet to position it on the tractor. I have bought an original dynamo, but as the original bracket was mullered, I ordered a new one. So once the engine block was painted, I put the new dynamo bracket on and painted it up after taking the photograph.
![]()
At first, I was enjoying taking the tractor apart. Now I am starting to really enjoy the re-constuction, even the little parts that are going on are steps towards rebuilding and getting it working! Based on current progress, if I can get the priming completed by the end of this week- next week the rebuild we really start in earnest!
The water pump below is looking pretty cool now it is primed!
![]()
I have figured, with a push and working for a good 6, 4 hour sessions, I can get all the tractor grinded and cleaned up, and then a base primer coat applied. Other than the sections on the wooden blocks and the axle stands this should mean the main body is sealed from any further rust etc. I have been doing parts as they have come off the tractor- but as there is nothing else to come off, now is the time to get the body completed.
I started, as always with the wire brush on the electric grinder. I now just use the makita battery grinder for the fine work parts and get it in the gaps that the larger brush can't reach. However the grinding of the engine block revealed a potentially shocking situation! In the photo below, there is a horizontal line starting to the right of the water tap across the block. Dan thinks this may be a cast mark- however I am concerned the block is cracked! :( The tractor was running, holding water and oil when we got it. The oil in the engine was also black with no water- so whatever this is- it doesn't seem to affect the engine operation. I'm hoping even if it is a crack it is not terminal...

Below you can see the fruits of around 3 hours of grinding, brushing and cleaning. You can also see that I took the water pump off. This is just three bolts into the engine block, underneath was loads of mud and gunk, so it was definately worth it. It gives much better access to the timing cover and allows the cleaning of the back of the water pump. I also took the oportunity to prime the pump.

The first priming coat took around an hour. The plan is that once the full first coat is done, I will go over the whole tractor with a second coat. I am applying the primer quite thinly, but making sure it has a good coverage. You can see the engine block coat below. I am also dabbing any areas on the previous coat that have thinned through due to more work going on.

My painting technique is actually quite funny. More dabbing than brushing! The trick with painting is paint an area looking at it from one direction. Then dab all the key parts to make sure the paint gets ito all the nooks and crannies. Then change position and look at the same area from a different direction, as usually there are loads of bits that haven't took the paint. more dabbing and it's all sorted!
Another opportunity to put a new bit on! Quite minor, but still exciting.. well exciting for me! Maybe not so much for the reader! One of the issues when I got the tractor, was that a alternator had been gashed on. The preious owner had re-drilled the dynamo braclet to position it on the tractor. I have bought an original dynamo, but as the original bracket was mullered, I ordered a new one. So once the engine block was painted, I put the new dynamo bracket on and painted it up after taking the photograph.
At first, I was enjoying taking the tractor apart. Now I am starting to really enjoy the re-constuction, even the little parts that are going on are steps towards rebuilding and getting it working! Based on current progress, if I can get the priming completed by the end of this week- next week the rebuild we really start in earnest!
The water pump below is looking pretty cool now it is primed!

Implements
I have found a great implements website, which provides all sorts of PTO attached tools from mowers to cement mixers!
I do like the look of the log splitter!
Compact tractor solutions
I do like the look of the log splitter!
Compact tractor solutions
Sunday, 19 June 2011
Ferguson's conquering Antarctica!
Have a look at this- TE20's in the Antarctic!
http://en.wikipedia.org/wiki/File:Tractors_in_Antarctica_(1957).JPG
http://en.wikipedia.org/wiki/File:Tractors_in_Antarctica_(1957).JPG
.JPG)
Ferguson TEF Toolbox
In my parts list I have found the list of tools that were supplied in the original Ferguson toolbox:

I haven't ordered the toolbox yet- as there are a lot of other priorities at the moment! I will try and get the tools put together first...

I haven't ordered the toolbox yet- as there are a lot of other priorities at the moment! I will try and get the tools put together first...
the finer and coarser details of bolts!
After struggling with grubby bolts and missing bolts from key pieces of the tractor.
I have spent some time trying to understand the finer points of nuts and bolts on the tractor.
My tractor has a combination of imperial and metric fixings, which I suppose has been bodged together over the years of ownership. I am trying to standardise on imperial to keep in line with how the tractor started off.
The parts list was essential in putting me in the right direction here, especially with the problem of connecting the engine to the transmission case. The parts list has Ferguson codes and a look up table. The codes that I have been looking to find are the:
353 564X1
353 426X1
353 702X1
353 707X1
etc
These can be looked up against the following types:
A bolt as I understand has three key metrics. Firstly the head type defines the bolt type- the Ferguson uses Hex heads, which makes it straight forward.
Using common sense the three metrics define the width and length of the bolt and the coarseness of the thread.
The coarseness is defined by the UNx acronym. UN stands for UniFied, and there can be a F for Fine, a C for Coarse and also a EF for Extra Fine. The Ferguson only seems to have UNC and UNF bolts on it.
The following bolts seem to be the essential widths on the Ferguson TEF 20, with a variety of lengths.
7/16 UNF
5/16 UNC
7/16 UNC
I did a bit of web searching, and I have found these master sets for each of the above sizes with a variety of lengths and associated washers and nuts. Nice and easy, but not cheap. The following website is excellent for these sets. I have bought a master set for each of the dimensions, with a hope to covering off most of the required fixings for the tractor!
and, as always the wiki- for a better explanation!
I am planning on filling the gaps and replacing the metric bolts where possible!
I have also won a Ferguson plough spanner on ebay! It has a inch ruler on one side and a cm ruler on the other. It was part of the original tool box, which is detailed in the parts list. Supposedly it is a fuel gauge, and plough ruler!

kigass diagram and parts required
From my parts list for the T20, I thought this may be useful for anyone trying to understand the kigass system.
It is the diagram of the kigass system:

It is the diagram of the kigass system:

I nearly have all the parts. I actually looks like a very simple system, to allow the 'pump' to move fuel from a small fuel tank to the inlet manifold.
I think I will be able to get this working like it should!
brake rebuild and front axle unbuild
Managed to touch up some areas of primer and paint up around the PTO on the back of the tractor. A new gasket arrived in the post yesterday- so we changed the gasket over and tightened up the new seal. So I think the PTO section is completed.
I have already been looking at PTO implements, but want to get everything working first before investing in any tractor tools!
We prepared and primed up all the brakes linkages, and great news is that the once seized brake linkage on the rear right of the tractor is all now running free, and reconnected. I basically took the entire section apart and cleaned and brused them back to the metal and then primed them. Once dried, we copper greased any exposed or moving sections and fitted it all back together loosely. Both sections are missing some springs which should all be delivered next Tuesday. At least we know it is all as it should be- once I get the remaining parts, I will build it and connect it permanently.
One issue is that the grease nipples on the parts and full of rust and mud- so the plan is to order some off ebay and replace where possible. The bars are fairly pitted, but it all adds to the originality!

The rear left brake section is also rebuilt and can be seen in the below picture. It is good to see the original faults getting fixed, and the tractor starting to go back together.

Whilst Dan was finishing off the brake sections, I turned my attention to the front axle section. The bolts holding it all together were all different and this was annoying me! So I am planning to buy new front axle bolts and have them so I can change the track width and have a uniform look at the front end. Trying to remove these to a LOT of force. The screw threads were badly corroded all the way to the end, so the nut never loosened- I can see why the previous owners never changed them. I used the 5 foot scaffold pole and the socket to move them- and even then it was difficult all the way!
Once the three were separated I get them a good wire brush and grinded back all the paint and dirt. I'm planning to get these all completed over next week - so fingers crossed for some better weather and light nights. I started with the middle section, however there are a lot of inaccessible parts and the central metal basin area was solid with mud! The whole area was full of hard packed, dry mud!
There was no way i could get a grinder in, so i worked the mud with a long screw driver and it started to flake off. This must have been in there for years and years! Even with the screw driver, there was mud I couldn't get out. So I carried the part round to the stable and used the car jet wash. This worked a treat, and with a good 10 mins of jet power, all of the remaining mud was dislodged and a drain hole appeared at the bottom of the section!
You can see the section below drying, ready for the primer coat:

Once dried, I primed up the whole part, as can be seen in the below pictures:

There is a lot of wear and degeneration of the metal, but the steel plate is stick very thick. The actual part that connects to the front of the tractor is solid, with very little pitting- so I am confident continuing the use of this on the tractor. If the rust and degradation was round the section that holds the weight on the axle, I would probably look to replace the part.

So a good, productive day so far.
I need to order, Front axle bolts.
Then this week, the plan is to do the equivalent work on the axle sections that connect to the wheels- so we can get the front end put back together and take the front wheels off.
I have also started degreasing the fornt section, so getting it cleaned up and primed before the axle gets reconnected. I know that once it is back on, there are a lot of areas I can't get the paint brush. I also cleaned up the oil filter housing and around the pump connection area.
Good news on ebay at the moment:
I have found a ferguson plough spanner
and
A twin set of fuel filters with all the pipe work! I have been looking for these for around a month now- so I will be very happy if I win the auction for a reasonable price.
I also managed to get a full parts catalog for the tractor, which is so useful in seeing how the sections of the tractor fit together. I now fully understand the kigass system and other parts that were missing!
The brake example is below:

Subscribe to:
Comments (Atom)