Saturday 20 August 2011

Test drive

So, we managed to get some of the key 'driving' functionality' fixed today. With a view to test drive the tractor and confirm all the mechanicals are working.

Firstly, we filled the gearbox and rear section of the tractor up with oil, it took a good 12 litres I reckon, and seems to slowly fill the rear section. Once filled, we started the tractor and tested the rear hydraulics - they work sweetly.. The rear arms rise and fall as required.

Once complete - a number of jobs needed doing:

-- Track rod connection and front wheel alignment. We got these screwed back so the wheels aligned - there is a broken thread on the left track rod end, so I need to order a replacement to actually get the locking nut on there.

-- Exhaust stack. This is an easy push on, and a metal bracket to hold it tight. 5 mins to get on, and really makes the tractor quieter!

-- Wheels. Using the trolley jack, I managed to get the front and rear wheels on to the tractor. All the nuts are tightened and the wheels are lined up nicely. The wheels are sound, but need stripping and finishing before re painting. This is a job for autumn! My plan was to send these away and get the shot-blasted, but it will be just too expensive- so planning to do it myself.

We spent more time with the loom, but its proving complicated! We have worked out the entire thing- other than the solenoid. we can't work out how to close the solenoid circuit by pushing the gear lever forward... Dan is taking it to the Agricultural Engineers for some advice!

Well, I got the beast started and went for a little drive!

First thoughts, the clutch is great- second thought, sh1t! the brakes don't work... So need to adjust them!

Either way, I tested all gears, including reverse- then decided to go for a little drive round the front field... It started off great, as I was driving down the side of the field, with the sun on my back, I had a moment of elation! I decided to turn and drive back up the field, and DISASTER!!!! The tractor seemed to start running out of power, I put full throttle on- but even then it felt weak.. until eventually it came to a halt.


I would start up great, but as soon as I put it into gear, and started to release the clutch it just didn't have the power to move...


Dan came over, and we got it started, put it on full throttle, it coughed and bogged then it almost popped and revved right up into life. I jumped on and drove it straight back up to the log shed- with no problems.

On closer inspection, it looks like the old/new fuel filter that I am temporarily using is not sealing and air is getting through and maybe even dirt etc isn't getting filtered. Basically the engine was fuel starved... The plan is to get one of the original fuel filter housings on, but we need to get a proper seal in the top, and also get some fabric washers to seal the line.

Things to sort:

-- Radiator alignment.. The radiator just isnt right, It needs to move down and bolt directly onto the metal base- I need to sort out the kink in the top pipe.

-- Fuel filters.. As discussed, the cause of all the problems! I need to get the filter housing on correctly.

-- Wheel restoration. the wheels are a mess, and need paint stripping, grinding up and then priming. I also need new tyres put on the back as the current ones are showing through to the inner tube.

-- Brake tightening. The brakes need sorting so they have some bite!

Either way, the first drive has been fairly successful and very enjoyable! with only a minor panic!


Tuesday 16 August 2011

Easy starting

Now it has fired once, it seems to be starting quite easily. I'm so happy that it is now running after the rebuild! It has really spurred me on to get it back together!

I now need to get the loom properly connected so the dynamo is changing the battery! On the weekend, I am going to have a good look at the rear wheel.

I also need to get a new throttle linkage as the existing one is badly rusted and can tend to fall off the new throttle lever ball connection.


...a tractor starting!

Just a little bit happy!


...a tractor nearly starting


...a tractor not starting!


STARTED!!!!

After 5 mins of sorting little things out, the tractor is running!!!

After last time, I have had the battery on trickle charge for a good few days. So today it had good charge.

I also checked the manual and noticed that the diesle pump needs to be topped up with engine oil. I bought a little oil can from the 'antique' shop in Henley. I loaded it up with my motorbike oil! Opening the cover on the fuel pump, I topped up the oil. This filled up and started running out of the tap at the bottom. I screwed the tap out and ensured that the springs were oiled and the base had a small pool of oil in it.

I have also noticed that the fuel filter is leaking, I will fix this when I put the original filters back on with the fabric washers. I think copper washers don't fully seal around the fuel banjo's.

I turned the fuel on, and disconnected the pre-air filter. To do the initial warm, I used a blow torch on the intake manifold. After about 30 seconds of the engine turning over- it started catching and kicking!

LOTS of smoke!

Then I disconnected the starter motor and the engine was running sweetly, I worked the throttle and it responds nicely.

I also check the clutch, gears and PTO- which are all working great! FANTASTIC!

One major issue, is that the rear right hand wheel isn't turning- i'm thinking maybe the foot brake is jammed on- but not sure, I need to check what is going on! Either way, the fact that it is running is great news and progress...


Even better news, is that Kasha has videoed the whole thing! I will post once I have worked out you tube etc!!

Now for a glass of wine, to celebrate!

Saturday 13 August 2011

smokin'

Today we have got the tractor turning over!

We filled the radiator, and fixed the various leaks on the hoses and gaskets. Still a minor leak from where the thermostat is, but should get this fixed easily. It is all holding water now.. which is great.

We filled the engine oil, with standard tractor oil- I forgot to re-oil the fuel pump, and need to sort this tomorrow.

The electrics now mean that I can start the starter motor manually- need to order a new solenoid as the old one isn't working correctly...

The fuel system was a nightmare - neither of the filter housings are sealing the fuel in, and leaking. I need to get new seals somehow... I have put the old/new filter in place, and that is even leaking from the banjo!

We eventually got the fuel system reasonably sealed, and tested turning over the engine. It does turn and smoke, but won't catch...  The next things to look at are the timing and oil the pump..

Good news is that the clutch, flywheel and starter are all great!


Sunday 7 August 2011

slow progress

Its slow progress at the moment.

We are going through the finer points of installing the loom.

Spade v screw terminals, control boxes, solenoids and cabling. It's coming together, but it is very stop and start. The air, cooling and fuel systems are connected- it's purely the electrics now that is causing difficulty.

The clutch pedal is sorted, and it is giving good feedback. Once the loom is in, it will be oil and fuel and ready for the start!

Sunday 24 July 2011

progress with new parts

So, after getting the plough together and a breakfast cup of tea, Dan turned up and we turned our attention to seeing if we could build some of the new parts on to the tractor.

Below is a picture of the new plough, which is now a graden feature- which soon will be a functional device on the tractor!


The first job was to rebuild the dash area. I had managed to get a new dash connection bar from Mark- I grinded this back and then disconnected the steering column area. The base dash area with the bonnet catches now is fully operational! The catches work perfectly- I cleaned this up and connected it with new bolts.

I also connected the auxiliary fuel tank bracket- i have to say that it is starting to be a very tight fit between the fuel tank and the dash area! I also grinded and cleaned up the second fuel filter housing, this can be seen below....


You can see below the dash area is looking a lot cleaner and tidier- the new throttle connection looks great. I have noticed that the dash only has two holes for meters, and I am wondering what the original TEF20 tractor actually had?

- Ammeter
- Oil pressure/temperature
- Water temperature


I have also tested the positioning for the ki-gass tank, and you can also see the ki-gass pump with the new part that i got from Mark. This is a twist/ratchet switch that is connected to the out section on the ki-gass pipe. When I was at Mark's we discovered that this is actually the ki-gass fuel filter!

This is now connected and I am looking at sourcing pipes, for the ki-gass system.


We started looking at the wiring loom, but eventually gave up- I can't find a decent/clear diagram and the agriline loom is useless. There is no diagram and loads of extra cables. I emailed agriline and they didn't have any instructions- very disappointing. Dan has took the new and old loom to the agricultural engineers to see if they can bring any sense to it!

In the below photo, you can also see the aux fuel tank- which goes in, but is a very tight fit and has loads of holes and connections which I have no idea where they connect to...


The new dash area requires priming, which I will get done on the next session- I just wanted to make sure it was all together as required, before putting any paint on. I have realised that the throttle linkage is quite rusted- I may look for a new one on ebay, as it keeps popping out when we put the full throttle position on. The new catches are great,my old dash had these completely rotten and jammed, however the working catches are great- and tested! Then pull on to a tubular area on the bonnet and hold the tractor together, which I assume is great for safety.


The final part is the connection of the fuel filters- again Mark came to the rescue with a second fuel filter housing. I need to work out the way it all connects together and may need some extra double hole bolts to connect into the new filter housing- but at least the filters are now in place.

On connecting the oil pressure meter, I have also realised that I need a hollow bolt for that also!


So, good progress- but nervous about the electrical situation at the moment as we don't have a clear solution. I am hoping Dan can speak to the guys who know this week and we look at getting it put together by the end of the week.

I can then look at getting the tractor started.

I have also took out the sump filter and sunk it in a diesel bath, to clean it up. The sump has also been cleaned of all the gunge and dirt in it. We are looking at getting the new tractor oil this week to fill the engine. Once the filter is cleaned up, it can go back together with a new gasket.

I need the following:

-- A clear understanding of the electrics
-- New battery cables

-- Fuel filter connection bolts/parts
-- Aux fuel tank connection parts
-- Ki-gass pipes
-- Electric loom connection

The parts have really helped, and I have made good progress- planning to get it all primed this week, and the electrical loom put on to the tractor. That will be a great position- then it is oil, water and fuel and press the go button!

Ferguson single blade plough

The last time, I nipped out to buy some motorcycle parts- I ended up with a tractor...

This time, I nipped up to Boston, to get some tractor parts-I ended up with a  PLOUGH! I was laughing when I was driving back down the motorway from Mark's. Every time I looked back into the back of the car, I started laughing!

When I was getting parts at Mark's, I saw the single blade plough, and I couldn't resist- it was in great condition- and as Harry Ferguson said, a tractor is no good without and implement. Hence the importance of the three-point linkage in changing agricultural methods.

I'm very happy- it's awesome. I reconstructed it when I got home and it looks great. Dan was well impressed! :)

Dan and I rebuilt the plough this morning, you can see the parts below in the picture. To give you an idea, a broken down plough will go in the back on any reasonably sized 4x4.


Below is the adjustment arm:


Reconnected the plough blade and the main chassis. Two big bolts attach the blade to the main metal arm. This connects easily, but the weight of the main part is difficult to line up with the blade. The best way, is to lay the blade on its side, then line up the heavy metal part. It means the bolts can be lined up, with only one person rebuilding the plough.


Below, the original Ferguson sign is attached to the side of the plough:


I knew there would be a use for my Plough Spanner!


I'm really looking forward to backing the tractor up to the gate, and attaching the plough ready for Henley show! I think that may be a video moment!

Thank you!

Firstly, before I post some serious progression, I would like to Thank Mark up in Boston...

I spent some time up at my parents and my dad, found the FOFH market place on his ipad! We stumbled on a guy up in Boston in Lincolnshire - after a few calls I decided to take the 3 hour journey up there to get a few bits..

Well, I was shocked! Mark is a great guy, with a treasure chest of Ferguson parts and some great tractors! He even has the holy grail - ki-gass pipes! To meet someone with genuine passion for tractors, and have a good chat and get the bits I needed was awesome...

I would advise anyone looking for parts/advice etc to get in contact with him...

http://www.fofh.co.uk/market2.htm

He is on the FOFH market place, and trust me- well worth the trip up the A1..

Thank you Mark, and no doubt I will be up again!

Here is a picture on one of Mark's tractors -seriously nice!


Ian

Sunday 17 July 2011

TEF20 Wiring diagram 12v

After some web searching I have found the wiring diagram for the tractor.

It seems the original tractors had two 6V batteries- one ether side of the seat. I am modernising on to a 12v system- I have replaced both the starter and dynamo for 12v devices. The loom is in place over the tractor, just need to work out which parts connect in!


This looks fairly straight forward, however I am sure translating it to real life will be slightly more tricky!

I will post pictures as I get it connected up. I am using the agriline loom and the agriline control box.

Sunday 10 July 2011

..motivated!

When I got back from Woodcote, the weather was great- so I decided to beat some of the problems that had stopped my progress!

Out comes the grinding disk!

I cut off the top of the seized bolt on the back left pedal, then hammered it through. I took the pedal off and copper greased the metal pedal connection. Once cleaned upm I reconnected and put a new bolt and nut in place. I lined the pedal up with the other side.


Once sorted, the battery platform was bolted back on. Now I can get a battery on and started putting the electricity loom on. I also go the seat bolt and washer on and now have the seat bolted on correctly- another little job that needed to be completed.


One of the fual housings off ebay came through- I put a new filter in there and have bolted on to the tractor. I need another one of these and then get them correctly connected up to the fuel tanks. I have the aux tank ready to go on, but need a bracket to get it connected properly.

This isn't going to stop me getting the tractor started though, on the main tank and one filter.


I got the air filter connected to the manifold.


Oh yeah! I also grinded the bolts and cleaned up the hydraulic lever. I connected it and painted it up. It needs the lever guide putting on correctly, but I just wanted to get the lever back on and operational.


The rear sectoin is really starting to look the business!


I practicised putting the bonnent on, it fits nicely.

I need to totally take off the paint on the bonnet- I will use paint stripper for this, then use a spray on primer.

I also need to order the new front T-Section and grille, as the rust and damage is very bad on the front end.


A good afternoon, fixing some little issues.

To do:

-- Fuel line between main fuel tank and filter
-- Replacement filter to fuel pump fuel line
-- Get the fuel pump timing lines lined up and tightened

Once complete - the fuel system is complete for the starting testing! Strategically, i also need to:

-- Get the Aux fuel tank mounted
-- Coonect the main and Aux fuel tanks
-- Add the second fuel filter and connect together
-- Connect the Aux fuel tank tp the filter
-- Mount the ki-gass fuel tank and connect the fuel lines

In terms of the controls:

-- Mount the dashboard
-- Connect the wiring loom up
-- Connect the controller box and controls on the dash

Once th fuel system and electrics are connected, a starting test can be done to see if the engine will start and the drive train/clutch are operational as expected. Once tested- then it is removing parts to do the grey spray, prior to rebuilding properly.

Woodcote Rally 2011

Had a great day today at the Woodcote Steam rally and beer festival.

Saw some great vehicles and some amazing tractors- I need to get mine entered for next year. I really enjoyed the atmosphere.. The TE20's weren't so good to be honest, and there was only 2 TEF20 Fergusons, most were TVO tractors. The few diesels I looked at, had the ki-gass and aux tanks missing! There seems to be a general movement, where people just get them running and leave them as they found them!

I have to say, dome of the Fordson and other makes seem to have a much more passionate following!

Photos from the day:


A nice finger mower structure on the below Massey ferguson:


I believe the below is a single cylinder Lanz tractor!


Awesome, Scammel truck! Started its life as a low loader...


This was probably the best restored tractor at the show, real attention to detail!


Nothing runs like a Deere!


One of the Fergie's! Nice lights...


A Caterpillar tracked tractor:


A wide track, Fergie.


I really liked this one, real cut down chassis, basically just a propulsion shaft to the rear axle.


The wide track Fergie with the crop sprayer:


It was a good show, based on the tractors I have seen, my restoration is definately at the top end! :)

This has motivated me and spurred me on!

Wednesday 6 July 2011

bits and pieces

I have received the tubing for the air filter/manifold... so I can get that connected up at the weekend. I have also managed to 'win' and fuel filter housing on ebay- so am planning to get the fuel system together running on one fuel filter to get it tested.. I am scouring the web for another filter at the moment!

So this weekend, I can get the seat on, then get the fuel filter prepared and connected. I may look to run some temporary tubing for the fuel- to see if we can get the tractor running.

I have had a look at the loom, and think I have an idea where it connects- so will see how we go!

Plan of action:

- Hack saw off the bolt on the left brake pedal and remove and re-align so I can get the battery platform in place.

- Connect the air filter housing

- Clean up and connect the fuel filter housing


Possibly have a go at starting to bolt on the loom to the dynamo, starter motor, heating coil etc..

I still need to sort the dashboard out, and get that connected...

Monday 4 July 2011

..some progress

I have managed to use my chainsaw sharpening file, to open up the hole on the seat spring and get the larger seat bolt connected correctly.

I have also ordered some hosing from Silver fox which should mean we can connect the air filter to the manifold.

I have also done some research on the loom, and have found a 12v wiring diagram- its just that the cable colours don't match the agriline loom! :s

Other issues/solutions are pending!

Saturday 2 July 2011

slow saturday

Not sure why- maybe its the heat or the early start, but struggled to get motivated today. We have completed a lot of little jobs, but there are a lot of little issues at the moment.

--The rear left brake pedal is totally seized so I can't loosen it to put the battery case on.

--The hydraulic lever is rotten, and I have bought replacement parts- but the bolts are rusted together so can't get the old part off.

--The dash board wont split into two sections again due to a rusted bolt.

--The fuel line from the pump has snapped and still don't have a replacement, and doubt the replacement is correct.

--The new seat bolt is too big for the hole in the seat spring!

So, I can't clean up the dash and start rebuilding it, I can't get the battery platform on, and I can't rebuild and prime the hydraulic lever.

I need to complete the fuel system, but there are two key stoppers here:

--no fuel filter housings
--fuel line broken
--no auxiliary brackets
--probably missing fuel lines somewhere.
--need to line up the fuel pump

I also need to somehow work out the electrical system, I have a loom- but no idea what goes where. I also have the control box, again, I have no idea how the loon connects to this, or what it really controls...

So we are close to getting the tractor running, but the small issues are quite significant!

What we did do this morning:

It turns out that aftermarket parts don't quite fit! The radiator doesn't seem tall enough so the pipe at the top kinks. We have sorted this by mounting it higher, which is starting to look really good. I am planning to shorten one of the hoses to prevent the kinking at the corner. You can see this in the picture below. So we spent some time finishing this off and getting the cooling systems complete. The large bolts holding the radiator in place will be cut short at the base.


We also spent some time filling the holes in the air cleaner and priming it up- while Dan was finishing the priming I cleaned up the main dashboard mount and primed it- once dried I attached it to the tractor allowing us to connect the fuel tank.

I have also connected the cross shaft to both the throttle venturi and the idle lever on the fuel pump. It all works nicely, however I am sure there will be a number of adjustments that are required.

I have replaced the throttle lever with a shiny new one, however as always the sting in the tail is that the throttle doesn't have the eye connector to the throttle linkage. SO ANNOYING! I need to work out where to get one from...

The air cleaner fits on nicely now as the dash part holds it on to the side of the tractor. The pre-cleaner can now be connected.


There is no hose to connect the air cleaner to the inlet manifold, we need to order one of these from somewhere as again, with these things you always seem to trip up at the last hurdle!


So its been a good day, but there are loads of little annoying issues at the moment- with no obvious solutions.

Either way- focus is on building the fuel system, and the electrical system.

Monday 27 June 2011

Fuel line

I have ordered the '7558' fuel line from agriline, but I am concerned it isn't the correct pipe.

TE20 Fuel components

It doesn't seem to have the correct end. However I can't find the correct pipe anywhere!

It can be seen in the below, 'award winning' TEF20

Fergie TEF20 fuel system

It has the correct pipe coming out of the pump on the left, then connecting to a flexible pipe into the left fuel filter.

You can see in the below photograph a TEF with the pipe that looks like it is from Agriline- so I am confused as to when this pipe changed etc. You can see it is connected to the top of the pump as opposed to the left hand side. Am I missing the obvious here?

PloughMyField photos


So will see what happens- but not sure about what has been ordered...

Sunday 26 June 2011

what next...

I forgot my 'what next' bit, in the excitement of squeezing lemon, lime and strawberries and mint into my drink!

I have to now get the dashboard and dash structure in place. This holds the fuel filters and the throttle connections. It also allows the connection of the fuel and auxiliary fuel tanks. There are some pipes that I need, and a part that I am desperate for- the aux fuel tank bracket!! I can get the tractor running without the ki-gass, as long as fuel, cooling and air are all working and in place. We are still nervous of the clutch- so we will be looking to test the starting on the axle stands.

I will also need to wrestle with the wiring loom and electrics!

So this coming week, the plan is to get the dash and dash structure cleaned and primed ready for reconnection. Then I can get to work on getting all the key bits hooked up for the first start of the tractor.

Look at the state of Joseph Smith- tractor engineer/border terrier after all the excitement and sun!

Brakes, cooling and fuel system!

All in one day!

Fueled by hot sun, a pasty for breakfast and Pimms, we have achieved a lot today!

To start with, while I was lying in bed, Dan had got to work rebuilding the brakes. Both rebuilds went well and all parts went back together nicely. Other than the bit where the pliers on one of the springs slipped and hit Dan in the forehead! His usual genius showed through and he created a wire loop, that he used to stretch the spring easily. Fantastic! A good tip here actually! - maybe the first one :)

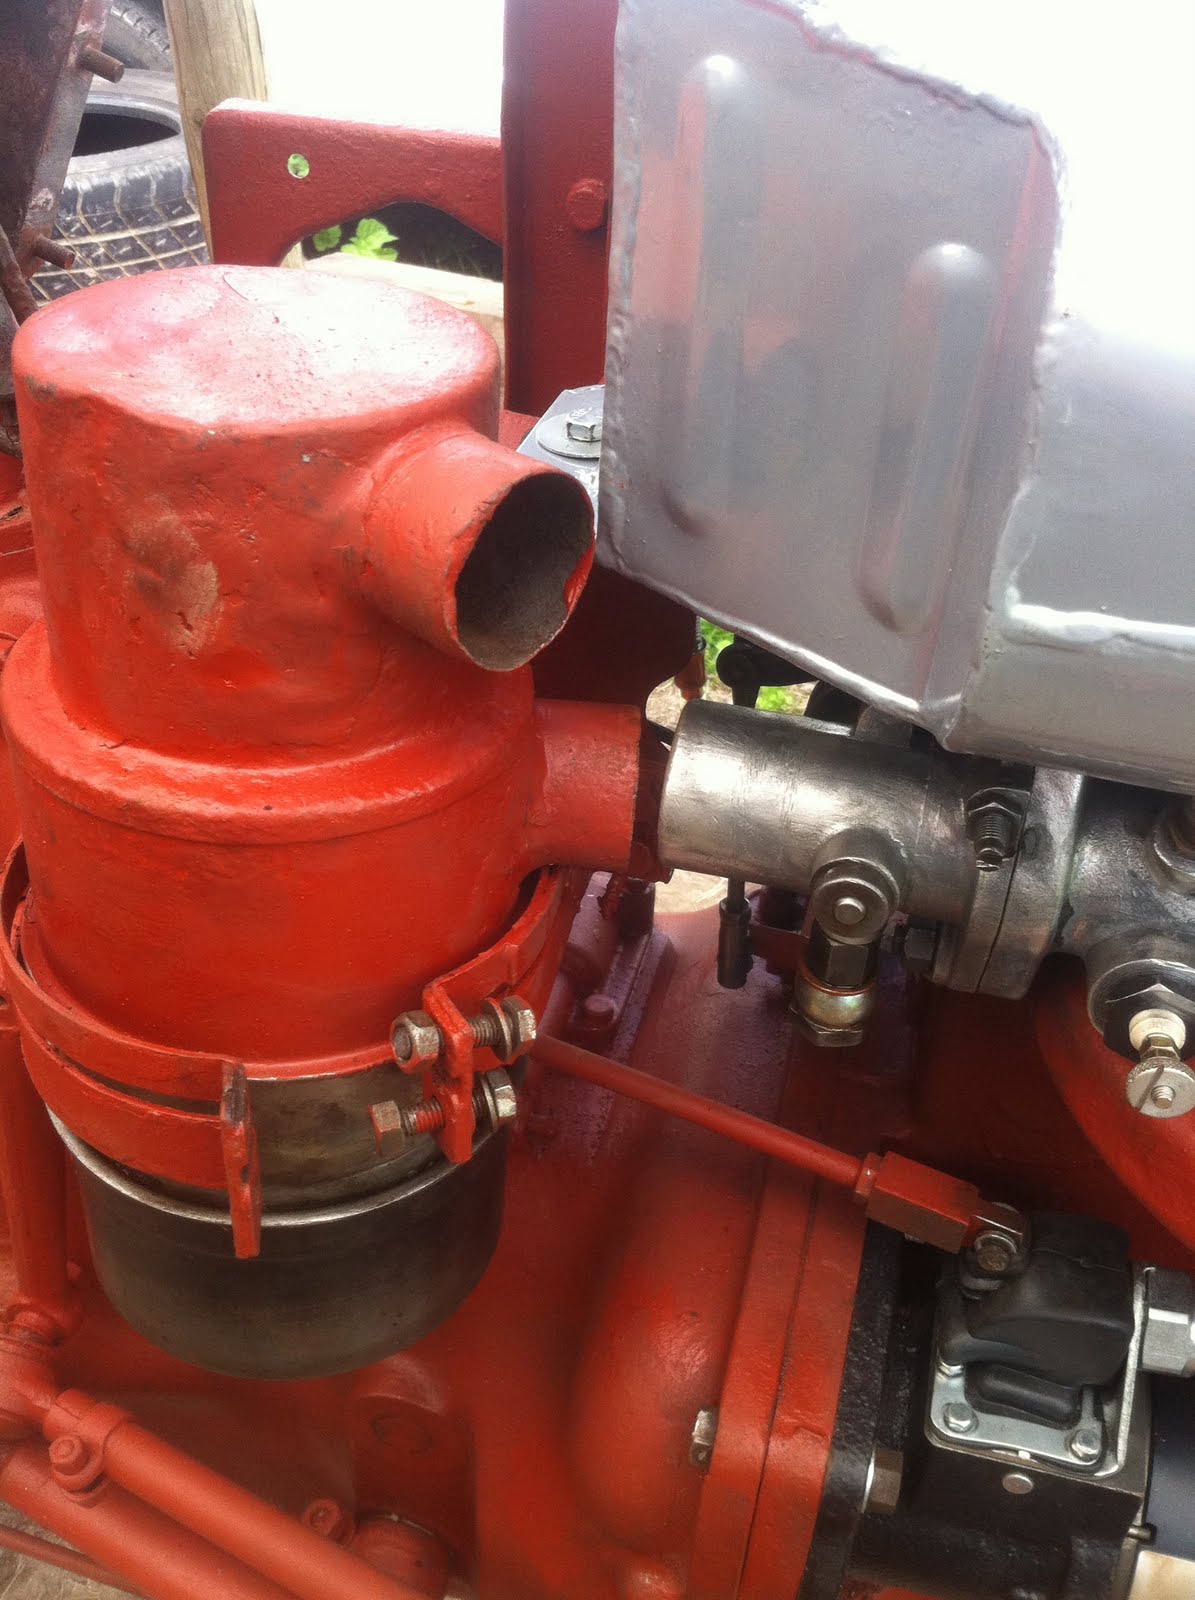
While Dan was finishing off the brakes, I got to work attaching the cleaned up manifold and venturi assembly. This went on easily. When I was taking it apart I was worried there was an order to this. As long as the exhaust is in place, the manifold went on nicely. I also now understand the ki-gass connection point - above the heater coil. I inserted and tightened up the new coil so everything is in place.

I won the new cross shaft on ebay, and can't wait to get it on so I can connect the throttle linkage!

As we were testing the brakes, I also tested the connection of the new radiator. This has a slight issue- I have replaced the whole front end of the cooling system- and the connection between the top f the radiator and the thermostat housing is not quite lined up, unless I lift the radiator up about an inch- which means the bottom bolts barely reach the base connection. The rubber hose goes on fine, it's just not a nice fit as I had hoped. The breather pipe is also fitted to the top of the rocker cover. The old pipes tend to try and kink at every opportunity, so I heated it with the blow torch.


Below you can see the radiator from the front. It's starting to look like a proper tractor!


I also got a new set of jubilee clips from Agriline which look, and operate nicely. Another tip here - again from Dan :) When you put the jubilee clips on - make sure you check the direction and access to the bolt. It makes it a lot easier to tighten and take off if you give it some forethought. In the photo below, you can see what I mean by the top hose doesn't quite fit properly.

You will also notice that there is no cowl on the radiator! It is relatively easy to get new radiators, however getting a cowl is a nightmare. I have managed to find one in Ireland, and hopefully it will be here by next week! It won't effect the first run and testing of the engine- but I will get it on, before I take the first drive.

I have also seen, a later fit to the tractor and additional part to the bonnet that protects the driver from the spinning fan. I am considering getting these- although I don't want it to look rubbish in the search for safety!


I have taken the below photograph to show how nice the set spring came up, and the completed brake assembly. We do have a minor issue. The brake pedal on the left hand side is seized to the linkage, we hoped that we wouldn't have to adjust it- but it interferes with the new/original battery box. I have sprayed it and am hoping to adjust it down, in line with the right hand side- as long as I can get a socket on the worn nut.

As well as a cowl, the guy in Ireland had the original Lucas battery covers for sale. I couldn't resist and have ordered one to go over the batter once it is installed. They look very cool, and had the original stamps and Lucas names on the top! Please, if you are considering restoring a TEF, do not underestimate the cost. Also, even as a fairly practical adult- I'm still attracted to shiny things and bling! I have already seen sticker sets and other bling-age for some of the connections and linkage!


Once the brakes were tested- which is three tests... Left pedal, left wheel- right pedal, right wheel and foot brake - both wheels, we decided to remove the blocks and put on the front axle stands. This will give me a chance to clean and prime the underside of the tractor. This went well, and has revealed a whole load of paint stripping, grinding and priming that is required. I am also considering removing the sump and cleaning it out- in fact, i'm definitely going to do it..

You can see the radiator overflow (?) pipe hanging down the side- I have now tucked this behind the inside of the radiator, so it doesn't get caught by the fan. Dan has also tajen the dynamo bracket to work, to grind of the extra part bodged on by the previous owner. It still will be gash- and IO am looking for a replacement original part. We had a laugh at the terrible quality of welding of the part and that Dan's friend Andy - who is a stickler for quality would just throw it away, in disgust!

I must ask Dan, to teach me how to weld!


Dan went, as he had an appointment with the cinema. He also goes through boots at an alarming rate- primarily because he works hard and on his feet all day. I have decided to order him a pair of Oakley Standard Issue assault boots- as I love them, but it would be good to see how they really are under proper stress!

Back to the tractor! I put the clutch pedal back on. It wasn't as bad as I thought, and just loosening the foot-peg bolts and shifting the radius rod out a cm, allowed me to squeeze the pedal back in place. This will need to be adjusted, but at least it is on the spline. I also have some new rubbers for the track rods, which will go on after the grey spray!

Dan tried to trick me with a question regarding why Harry Ferguson chose grey for the Little Grey Fergie. Fortunately I had been doing my research the night before! I had discovered that Harry Ferguson sourced the paint cheaply from the Navy- battleship grey! So there is no one standard colour for Fergie's- they were painted with the paint supplied by the military.

Quite cool- but I need to start looking for the right paint pretty soon!


After a break and some Pimms in the sun, I started feeling edgy- edgy that I wasn't working on the tractor!!!

I decided to plan the fuel pipes and see if I had what I needed. My plan was to lay them out on the ground, then compare against the fuel lines in the parts manual. The tractor had been butchered, before I got it - so I am constantly looking at buying new parts to get it back to original - how ironic!

I laid out what I have and have bought on the grass:


I felt confident, and lying in the sun isn't my thing- so I got to work!

This took some time, but I attached the fuel pump to the body and made sure the new gasket was in place and scratched around for some temporary bolts- I need some help here - what is the correct fixing for the pump to the body??

I managed to secure it, and started by connecting the pipes that connect the injectors. After some fumbling, I found the easiest way, was to take all the injectors out and loosely connect them to the mani piping- then with some bending and swearing I got all the injectors connected to the body. I then bolted the injectors on properly, and tighten the pipe nuts. I have previous cleaned up the injectors- and I have added new copper washers where required.

Once on, I then laid out the pump- injector pipes. The easiest way seemed to be to connect the pipe to the top of the injector, then bending/swearing line it up with the pump connection. Then screw it on, and tighten with the spanner. Some re-alignment was required to make sure none of the lines were touching, I then connected the line that connects up to the fuel tank- this is new and wasn't on the tractor when I got it!

After all the injectors were connected I lined up the main fuel line to the filters- you can see I had replaced the original connection with the flexible fuel line. DISASTER! Obviously I was getting cocky, and the pipe just sheared- I knew it was rusty, but I hoped it would be ok. You can see just under the bracket where the pipe has broken. I need to search for a replacement! :(

I have left it on for now. I finished off with the tube that goes from the pump to the inlet manifold- I have no ide what this is for- i guess it;s either air tio the pump or fuel to the inlet?? This took a bit of heat and reshaping to get it to run under the injector pipes- but I got it there. You MUST connect this to the pump first- as once it os one, it is easy to flex and line up with the manifold.

The results are below- i'm very happy- other than the broken bit.


I'm a curious person, and couldn't help unscrewing the plate on the pump- I also unscrewed the oil runoff- which loads of milky oil ran out of! The springs and pump inside look in great condition. I gave it all a good spray with wd40. I also read the plate which says the pump should be filled with engine oil during install. I must remember that there are loads of different points that need to be refilled with oil!


So, its been a good day- or has it? I won't know until we try to start it.

An extra bonus was that last night I was reading the ploughmyfield blog and I now understand that my tractor is missing all of the decompression parts. The bloke who I won the cross shaft off told me he has combined two tractors into one, I asked him about the decompression- and he has the shaft and front lever! YES! He is sending it with the cross shaft on Monday. That is great news...

right..


Pimms!

Saturday 25 June 2011

Ferguson TEF20 restoration: Godzilla!

Ferguson TEF20 restoration: Godzilla!: "So I got off to an early start today. The plan was to get the front end sorted, and start rebuilding the steering linkages. The weather has ..."

Godzilla!

So I got off to an early start today. The plan was to get the front end sorted, and start rebuilding the steering linkages. The weather has been predicted to be 28 degrees this weekend, but early morning was quite cool- so good working conditions.. I, as always start off with a few easy jobs, just to get into it.

I started attaching the engine breather- no worries, just made sure I had the new gasket in there. I will be painting this up, as it will get sprayed grey as part of the spraying process- which is coming soon!


I then decided to complete the front end and get it cleaned up properly, I needed to take off the wheels. The bolts were stuck solid, so I used my leverage bar- that I now call Godzilla! I also have son of Godzilla - who I will show you in due course! Godzilla made mince meat of the seized nuts and the wheels were off in no time. It's important you do this, as I realised the wheels were badly rusted to the hubs and had to whack them to get them off even after I had removed the wheel nuts.

It also gives a lot better access for the cleaning up process:


I completed the same process both sides, and spend a good hour on each axle with the grinder. I pretty much got all the paint and rust off- however due to the cast space it is quite difficult to get into the recesses. I use a fl;at blade screw driver and wire brush to finish off. Once finished I painted up the back side of the axle and let it dry before connecting it to the center axle. I have some nice uniform new axle bolts to use- and they look awesome when on.

I also experimented with different track widths but finished on the below configuration. You can also see that the steering is slightly off- this was tricky to get right. When you pull the steering linkage all the way back, it seems to disconnect from the rack. Meaning it's quite difficult to get lined up again. This took a good 20 minutes of fiddling to get lined up. They are pretty close, but I will make some final adjustments on the track rod end when I come to bolt them together. Once the axles are mounted I can easily finish off the painting.

There is also a point that most of the grease nipples are already full of paint. My plan is to replace them all, after the grey spray! I have a full box of imperial nipples ready to go on and then I can grease up all required parts.


I was well ahead of schedule- a good focused session of 4 hours completed the above work. The grinding threshold is about 4 hours before I just can't take anymore- but I am getting better.

So a nice cup of Yorkshire tea and a chat with my friend Marcus who dropped by and I was raring to go for some more tractor action. Marcus looked quite envious even though he won't admit it and prefers to take the piss out of my restoration by referring to it as Tractor Sex. He was off on his motorbike to a lifeboat charity event.

So I turned my attention to some of the parts that need preparation.

I started with the seat. It was completely rotten- I will be ordering a new seat pan tonight. I did manage to salvage the spring though. Dan had arrived and helped splitting the seized nut with a hammer and chisel. This freed the spring from the seat, then I grinded it, primed it and bolted it on to the tractor.

You can see in the below picture- the next parts I want to focus on are the beaten dashboard parts. I have removed all the dials and key etc from the existing dashboard.


I soon got a bit bored of grinding, I have however cleaned up the whole of the front of the dashboard, but still need to complete the back of it- It also has a big rusted hole behind the ki-gass instruction plate. I also laid out a few other parts that need completing! I decided I would do the drawbar as it was the least 'technical', I primed this up so it is ready for spraying and re-attachment.


A great piece of news, is that I did more testing of the ki-gass pump.... and got it working!!!! YES!!!!

Cleaning it up and fiddling around I released the plunger and have done dome tests and it does build up air pressure in the output pipe! This is fantastic news- so I have the tank, and need to check I have the copper tubes- I may need to order these, but it does mean I can get ki-gass working!! I was quite worried about this, and to get the pump working was a great feeling.


Once I had cleaned up the dash, the paint on the front end had dried- so I wanted to get the track rods connected properly and the foot pegs put in place and primed up. In hindsight this is a massive error! Later on I realised that to get the clutch pedal on, you need the track rods off. So at some point I will need to remove the left tract rod to get the clutch pedal on properly- very annoying. Either way, I copper greased the rod ends and they slipped in and I pinned them with the foot pedals.

It is actually starting to look quite cool. Some minor adjustments to the tracking is still required- which I will complete later. I have also started positioning my new bolts where required. Various nuts and bolts have been missing from various parts of the tractor and my new ones are going in nicely, still not recognising C or F threads first time though! :(

You can see below, that I have also reconnected the starter shaft and spring.


Below is a picture of the rods and foot-peg connected and no chance of getting the pedal on! When the paint has dried properly, I will whip the foot-peg out and see if I can pop out the ball joint and push the pedal on- with minimum of fuss, hopefully- or an hour of struggling.. more likely!


It was time for another cup of tea and a chat with Dan- he was buying a new car- sounded good.

We discussed what we were going to do next and the plan was to get the starter motor, dynamo and fan belt on to the tractor. We are going to get it running before we do the grey paint spray- so we can confirm all the change we have made are operational. Especially the clutch- if we have to split the tractor again, we don't want to ruin the grey paint. So the focus now is to get the fuel, air and cooling systems back in place. We go the starter motor on, without too much difficulty, other than a nut witch is ridiculously difficult to tighten up. The dynamo is now on the bracket but we hit some complexities caused by the previous owner!


When I got the tractor, there was an unsightly alternator on it. To get the alternator on, the previous owner had butchered the bracket with new drill holes and what I didn't realised he had welded an extension part on to the dynamo bracket. We only realised this when we were trying to fit the dynamo. We are going to hacksaw this off tomorrow and then fit the dynamo properly and get the fan belt tightened correctly. You can see below the extra part that has been welded on to the bracket.

You can also just make out the seat spring back on, nice and orange!


Here is my summer picture out of the log shed! Looking forward to do ing nothing in the 28 degree heat tomorrow!


The final image below, is showing the starter and dynamo attached. The started was a fiddle to get the connection link to sit correctly. It seems to approach at the wrong angle. We managed to sort this out by shortening the link by cranking the connection to its shortest setting. I have tested the starter from the gear stick and it definitely engages the solenoid- so it seems all good.


The plan for tomorrow, is for Dan to start early and rebuild the brakes, whilst I concentrate on reconnecting the fuel system. There are definitely going to be parts of piping that are missing, so I need to work out exactly what to start ordering!

In other news, I have won a new hydraulic lever and the cross shaft on ebay! I snook in at the last minute... So as soon as I get them, they will be going on!


Right, to order the seat pan...