Just found this link, with some details on the three point linkage and the TE20
Ferguson Museum
Tuesday, 31 May 2011
air cleaner cleaning
After a quick search on the web last night- getting a replacement oil bath air cleaner doesn't look particularly easy. There are lots of more recent style Massey Ferguson cleaners- but none of the original style.
I decided to clean up the existing one. I wire brushed it off and grinded back the paint to reveal a fairly holey air cleaner. I think this part stays fairly cool, so am planning on filling it and then spraying it. So worries over on the air cleaner issue.
Interestingly the air cleaner oil bath is full of seeds! The tractor obviously has done some proper work at some point- and never cleaned out properly!

I also tried a metal punch and hammer on the seized wheel bolt. Still no joy- but I'm not sure I was fully committed to the hammering. When I bashed it, the metal punch springed off into the logs, and now I can't find it- typical. I did a quick search, but it was nowhere to be found. I'm starting to think about just drilling out the head of the bolt, or bashing it to try and break the head off the threaded part...
My friend Marcus came round to have a look- and have now enlisted him to help with the splitting of the tractor and replacing the teeth for the starter.
After lots of web searching I can't seem to find anywhere to buy replacement teeth for the starter motor- and also spotted on the web, that the starter teeth are in fact ruined as the new ones don't have a beveled edge. I'm considering now a new/original starter which is approx £200... I'm keeping track of all the costs and when I have a running/working tractor I will add it all up!
The Makita battery grinder with the wire brush was a great purchase!
I decided to clean up the existing one. I wire brushed it off and grinded back the paint to reveal a fairly holey air cleaner. I think this part stays fairly cool, so am planning on filling it and then spraying it. So worries over on the air cleaner issue.
Interestingly the air cleaner oil bath is full of seeds! The tractor obviously has done some proper work at some point- and never cleaned out properly!

My friend Marcus came round to have a look- and have now enlisted him to help with the splitting of the tractor and replacing the teeth for the starter.
After lots of web searching I can't seem to find anywhere to buy replacement teeth for the starter motor- and also spotted on the web, that the starter teeth are in fact ruined as the new ones don't have a beveled edge. I'm considering now a new/original starter which is approx £200... I'm keeping track of all the costs and when I have a running/working tractor I will add it all up!
The Makita battery grinder with the wire brush was a great purchase!
Monday, 30 May 2011
me working on tractor
Kasha decided she would take some photos of me working on tractor! Somehow I always end up with a dirty head! I don't think you can use swarfega on your head!

Obviously at the sign of a camera, Joe runs in to steal the limelight, and pull a pose!

I am getting close to ordering some overalls... oh dear. :) Now, to get Massey or Deere!

Obviously at the sign of a camera, Joe runs in to steal the limelight, and pull a pose!

I am getting close to ordering some overalls... oh dear. :) Now, to get Massey or Deere!
Reasons to restore a tractor
I have realised one of the reasons that I am doing this, is being outside in the fantastic place that I live. The scenery and the feeling of calm is great. All other stresses and thoughts soon get displaced by the work and the surroundings- which is a great feeling.
This is the view from my wood shed/workshop!

Another view over the bonnet of the tractor- looking forward to when I can start it up and drive out!

Am very lucky to be able to live and work in a place like this.
This is the view from my wood shed/workshop!

Another view over the bonnet of the tractor- looking forward to when I can start it up and drive out!

Am very lucky to be able to live and work in a place like this.
Air box and wheels
In worse news, whilst cleaning some parts off the tractor, I started working on the air cleaner. It looks rotten, and I don't think it can be fixed up to the standard I am looking for. I will spend some more time on it, but there is a rusted hole in the housing- this can be seen below. I will look at the cost of replacement, if it is reasonable- I will go for it.

I have also looked at the rear wheels. They need stripping and painting- I am looking at getting a quote to outsource the shot blasting and repainting, however a replacement looks like it may be cheaper. No idea about the cost of tyres either- its not important now, and will wait until later in the project to get them fixed up. They have a lovely colour of red under the flaking grey paint. Just 5 mins of wire brushing managed to get a lot of the flaky paint off.

Tractor tyres are cool!
Time and money....
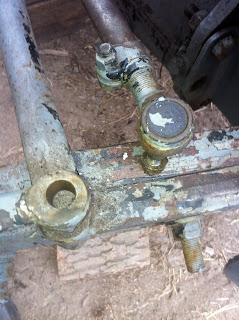
Au revoir track rods!
Good and bad progress this morning
I have tried to move the bolt on the rear brake drum- with no success. I have heated it, and tried to move it- but it won't budge. I just can't get the leverage with a regular screw driver - I need something with a wider blade. The offending item:


So am fairly pleased with this morning's progress. Still concerned about the rear wheel drum, but am confident I can overcome!
I have tried to move the bolt on the rear brake drum- with no success. I have heated it, and tried to move it- but it won't budge. I just can't get the leverage with a regular screw driver - I need something with a wider blade. The offending item:

While it wasn't raining this morning, I managed to clean up a number of items- including the fan, fan holder the ait pipe intake and the other components attached. I have put this in the box with all the other items ready for painting and reconnection! You can also see the flywheel teeth set that needs to go on. We need to break the tractor to get this in- which we need to remove the track rods. We couldn't manage this on the weekend- so I thought I would turn my attention to the track rods.

The track rods were completely seized onto the front 'axle'. I didn't really know how these connected- but Dan insisted they were bolted down on to the cast swing arm off the wheel. So I took this approach, I managed to unscrew the lower bolt and then spray on the penetrative fluid- waited a few minutes then started to tap the top of the wheel area while holding the track rod.
It wasn't budging and I tapped away for a good 20 mins with no success.
I managed to borrow a small blow torch to try the rear bolt- so I figured I would give the track rod connection a little heat. I set it quite low and just moved it around the connection for say 30 secs/1 min. I then went back to the tapping. With three taps, it flicked right out!! YES!!!

I started the same process on the right hand track rod- this took about an hour of heating and tapping. I was pretty confident, and eventually it tapped out.

When I actually had a look at the connection, the track rod connection is tapered downwards. So I can now understand why it became so jammed over the time it has been connected. I guess the heat just loosens up the connection. I have tried to take a close up shot, to show this.

So great news on the whole splitting of tractor. I am now going to organise with Dan to help out and get the new teeth on. I have had a look at the started motor and it's teeth are also worn away- am not sure if they are meant to be like this, or even if you can replace the teeth. A new starter motor is very expensive and am looking to avoid replacing it. I have a photo of the starter motor below. If anyone thinks this can be replaced/or needs to be replaced, please get in contact with me. I would ideally just change the teeth.

Sunday, 29 May 2011
A helping hand!
My friend Dan is helping me on this project. Providing skills, knowledge, contacts, tools, strength, common sense and pasties!
His website can be found on the following:
Chiltern Naturecraft
I suppose he should add a page for vehicle restoration!
Thanks Dan
His website can be found on the following:
Chiltern Naturecraft
I suppose he should add a page for vehicle restoration!
Thanks Dan
Good news- 1 original TEF20 fuel filter housing!
I have just won one on ebay! £8... nice
Just need to find the second one!
Just need to find the second one!
Border Terrier 'engineer' Joe!
Here is our Border Terrier -Joe, helping out with the restoration. Rather, stealing logs from the log shed at every opportunity!


Lots of pictures of progress so far!
As the tractor was when I saw it first time. It looked like it needed a few minor things, and some cosmetic work! Oh how I was so, so wrong.

See below the block, and the effect of the grinder on the dirty paint.

Here is the right brake components exposed, ready for breaking down and cleaning. I can't get the set off at the moment, the bolts are totally seized...

You can see below where the fuel pump is run from the mechanics at the front. No electronic pumps- awesome! The oil filter is below- this needs to come off for cleaning and replacement- must remember to do that!

You can see below a number of things! The teeth on the flywheel, where the starter motor has been removed are completely shot to bits! I have started getting the paint off the block, so I can get the engine number and get a build data eon the tractor. From the model I think between 1951 and 1956, but not sure. Supposedly there are two different engines 20c and 23c- need to work out what that is all about! The engine block gaskets were all ruined- but i have ordered the full gasket kit from agriline... cool!

The dreaded seized real left drum! What to do?? I'm planning getting some heat on the bolt next... You can also see that there is no brake pedal- I have removed this to start trying to un-seize the brake control mechanism.

The whole 3 point linkage I haven't looked at yet- i'm just hoping that the hydraulics will work. When I bought the tractor the linkages were up- so i'm guessing it was working at some point. I have loosened the control level off- it moves nicely. The PTO engaging level makes a positive noise so fingers crossed...

See here that the whole dash is out and there are lots of missing components :s

Dashboard piece needs grinding and the rear skins are a state. One is ok, the other is full of filler. I think it will be a full replacement- but am seeing this as a final thing.... It will be nice to order and fit them, when everything else is working!

The water pump has cleaned up nicely and the chain cover is looking nice after some easy grinding with a wire brush. I have all the parts in the back room, or ordered to complete the cooling system- I think! So will rebuild once the paint is on the block.

missing bits
Note to self:
Missing bits:
-Ki-Gas system
-Fuel filter housing(s)
-Bracket for the auxiliary fuel tank
-Associated piping and fixings
Need to locate some of this stuff- not sure where though...
Missing bits:
-Ki-Gas system
-Fuel filter housing(s)
-Bracket for the auxiliary fuel tank
-Associated piping and fixings
Need to locate some of this stuff- not sure where though...
Wheels off
The current state

So the work that has been completed so far:
-Some scratching a stripping
-Removed bonnet, radiator and cooling pipes
This was to fix the radiator, but it turned out to be rotten- so needs replacement. When I took the radiator off, all the hoses were perished. Then I found out that there was no thermostat, and the top pipe was a bodge job. I removed the pipe work, hence you can see into the engine block - The orangey bit!
So the whole cooling system needs fully rebuilt- I think i have all the parts ready, but want to grind back the paint and respray the block before I put it back on. I also removed the fan belt and fan which needs brushed and sprayed.
-I have removed the fuel system
All the manifold and air intakes have been removed, along with the fuel pump and the pipe work and injectors. It looks like one of the injectors didn't have any copper rings and was leaking diesel. I have wire brushed all the injectors and they are looking a lot better.
It also turns out that the tractor was missing the aux fuel tank, ki-gas system, and has had a recent fuel filter put on it. So lots of kit to order!
-The Alternator has been removed, and I have the new dynamo ready to swap it.
-The starter motor was not starting the tractor correctly- so I removed it. Oh dear- the teeth on the flywheel have been ground away and the teeth on the starter motor and ground away- hence the strange noise on starting. The flywheel teeth ring needs to be replaced and I need to work out what to do with the starter motor.
-Removed the exhaust and manifold- rotten.. needs to be replaced. I have ordered new- with the cool little top exhaust bit that protects the engine from rain...
-I have removed all the dashboard and linkage to the engine. This was a rubicks cube of bolts and nuts- All covered in 4 layers of paint and rusted on solid.
-Have started removing the steering linkages/rods, as I need to split the tractor with a view to replacing the flyweel teeth and putting a new gasket on. There was an oil leak from the main part where the engine connects to the body of the tractor. However the rods are jammed on the front axle. Need to work out how to fix this.
-All the oil has been drained- however in the back, the oil was milky- which suggests a water leak. I think this has come in through the PTO, as there are now cracks on the case. Fingers crossed here though. Strangely on the back right of the tractor and wooden bung had been made to block a hole up. When I drilled this out, I was sprayed with milky oil- It stunk! and ruined a pair of combats and my favorite KTM t-shirt.. grrrr...
- Have removed the back wheels and am starting on fixing the brakes. The back right brake doesn't work and looks like the brake bar is seized. I have started taking off the drums, this was ok on the right- but the left has a strange countersunk both that has totally seized. Have tried the penetration spray, tapping with the hammer and a lot of force- but its stuck solid...
- The whole air filter etc has been removed and looks ok- just needs a good clean up. Also the pre-cleaner was missing- so i have ordered a new one.
-I have had the rocker cover off- everything looks pretty sweet in there- but has a small crack in the cover and again the gasket has perished.
So the next steps are:
-Fix the seized bolt on the rear right break hub with a view to fixing the brakes.
-Deconstruct the rear left brake mechanism and clean up
-Start cleaning up the air filter and other pieces that have been taken off
I think that is about it. I also bought a great Makita tool kit with a battery grinder- which is doing a great job at getting the paint and rust off.
Makita tool kit
This is well worth investing in!
I have found however when I grind the paint off, it rusts over again! So I have ordered some red oxide primer paint from ebay...
I think thats everything- I will put up some detailed photos on the problem areas....
Either way, the deconstruction is going well- I have no idea where anything goes though. ugggg
Ian
Some great websites...
The following websites have saved me.
I never realised how a 60 year old vehicle loses so many original parts, and new bits are added. So far I have had to gets lots of new- original parts. Dynamo's, pipes, filters etc. Over 60 years, it seems farmers or tractor owners use ingenuity to bodge fixes as opposed to replace broken parts.
Awesome range and great service:
http://www.silverfoxtractorspares.com/
Great prices and super fast delivery times:
http://www.agrilineproducts.com/
These have been my 2 main sources of parts, am also looking at ebay most nights to see if I can get cool bits.
lessons learnt early on
I have been working on the tractor now for about 2 weeks.
I will add lots of photos for the deconstruction so far, however I just wanted to update a few key points.
-It will take a lot longer than expected
-It will cost a lot more than expected
-Big up front investment in power tools is required (cool!)
-Buy some dedicated overalls/clothing or ally our clothes will end up wrecked
-Buy some gloves for working with, or all your knuckles will be skinned
-Buy some swarfega, or your entire house will be covered in oily finger prints
I now have all of the above and everything seems a little easier!
What i should of done, is take lots of detailed photographs before taking things off/deconstructing the tractor. However, this seemed to happen organically- rather than with foresight and planning.
I now have some huge cardboard boxes full of dirty/oily parts! With no real idea where they came from... :(
What could possibly go wrong?... ahh.
Where it all started... Sat 14th May 2011
Hello
I have worked in the It industry for all of my adult career, I'm 32 years old and since moving out of central London I am getting more and more into the rural way of life. I am always looking for new projects and have got into gardening and growing my own vegetables. My love of machinery though has had me looking for a new project...
....and so, a friend of mine suggested there was a tractor for sale. It was from a mutual friend of ours, called John. John had gone to a garage sale- to buy a garage. However inside the garage he had stumbled on an old tractor. He bought it with a view to selling it on. Now, you see- around where I live these are very sought after- and as soon as people realised John had one of these to sell- his phone was ringing off the hook. Fortunately I had bumped into someone else that knew John was picking it up and bringing it home- I was straight over there to take a look. The photo below is what I saw!

It was running, and I was overcome by the rawness of it - noise, movement and it looked like just the project! It was running, but there were a number of issues with it.
-No battery
-Alternator on it, but not working
-The radiator was leaking
-Difficulty in starting
-General condition/rust etc
Based on these minor issues, I thought I can fix them and fix the cosmetics- job's a good un!
Now the whole tractor restoration had got my attention. A farmer who I go shooting with, runs ploughing competitions- awesome. I also have a large meadow area at the top of my back garden that needed cutting. I had totally justified the purchase. John and I agreed, that I would go and do some internet research, he would hold it for me for the rest of the day. The price was agreed.
I nipped home, did some research and spoke to my dad. He was very excited at the prospect of being part of the restoration. He told me a 'little grey fergie' was what he learnt to drive on. I looked at the costs of restoration and was estimating around £1-2k... I had never restored a vehicle before and had very few tools- and very little idea of how to use them!
What could possibly go wrong!
I checked out my log shed, which would be my workshop- and arranged delivery for Saturday morning at 7am!
Subscribe to:
Comments (Atom)