Sunday, 19 June 2011

where it all began- no really

After some digging around on the internet, I think I have found an explanation of the cast numbers. They relate to dates, on when the various parts of the tractor body were cast.

The rear section of the tractor body has the following numbers on it:

5
1   9 2

As I understand it this means the tractor part was cast on 1st September 1952.


The engine block has the following numbers on it:

4   9  52

Which, using the same logic 4th September 1952


So based on this the tractor was built in late 1952!

The engine cover may not be original but assuming it did originally come with the tractor:


The tractor was sold from:

Western Motors Limited
Riverside
Camarthen
Wales

Commercial and Diesel engine specialists
phone: 7496

Saturday, 18 June 2011

my tractor 'tache

Last year, myself and Marcus participated in Movember!

http://uk.movember.com/

I have decided to start early and grow a moustache in honour of the tractor restoration!

the right way to fit the engine

After all the hassle we had, I did laugh when I watched this guy fit the engine!

photo hardware

I have had quite a few emails asking what camera am I using..

I have never really been into camera's, and even with an expensive SLR in my hands- I seem to take poor photographs.

I am using the awesomeness that is the iPhone4!

Ian

rear end

This morning I have focused on cleaning up the rear end and underneath of the tractor with the grinder and brushes. The plan was to get it all primed up. 

There are two minor issues at the moment. The pin at the rear of the tractor is stuck solid and it is damaged at one end. I need to get this out and was planning to grind it out with a metal cutting blade- but then realised that it is stuck in the middle also.

Dan hasn't been here today, so I figured I would wait until Dan gets here tomorrow to advise on how best to remove it. The other issue, is the spring that holds the linkage is badly rusted and the bolts are damaged. I need to get this off to clean it up- but I cant even get the socket on it. The adjustable spanner has no chance. It does seem that where the spring connects to the tractor there is another layer of metal, this just causes more issues- so again, jobs for tomorrow are to get the pin out and the spring off! Check for the update tomorrow afternoon!

I also wanted to get the brake drums tidied up as well as making sure the PTO seal was in properly.

I had a good idea to get the PTO seal in! I put on the PTO cover and it provided a way to push the whole circle of the seal in- by tapping the outside of the cover with a small-ish hammer. I did this and now the cover can screw on top the rear of the PTO. Nice positive start!

I thought I would take some BEFORE and AFTER photographs of the rear end! Since getting the seat off, I have much better access for the grinder and cloths to clean up the nooks and crannies around the bolts and the rea mechanism. I started by taking off the hydraulic lever, it is badly corroded and am planning to find a replacement.


I also grinded back the brake drums and cleaned them up ready for priming. I have been wanting to get this done for a while- as I am keen on getting the brakes re-assembled, especially as I have fixed the seized rear left brake.

As usual, the summer weather is not helping me, by raining heavily all morning! I started early with a view to completing mid afternoon- but the rain has been so heavy. I decided to push on anyways, as if I wait for dry weather I am never going to get completed. At least it is quite warm!

I have also been using my overalls- which are brilliant. They are solid material so and keep me a lot cleaner. especially with the grinding! The rear of the tractor underneath is covered in oily mud, which makes a right mess when it comes off. There is no easy way of getting it off, other than grinding it back.

I got most of the are cleaned up in a few hours- which seems to be my limit with the grinding. The noise and vibrations get annoying after a while! So it means I can focus on a specific section and get that done properly.


it is also quite cool, that as I grind back the layers of paint, all sorts of cast stamped numbers are appearing on the tractor. I will go round the tractor and note the location and numbers down at some point to see if I can get more of a history of the build of the tractor. As you can see below the rain was absolutely pouring! Interestingly, in the below photograph you can see the vineyard on the other side of the valley- which is loving this sun-rain-sun-rain weather!

Since leaving London, I have always been quite aware of the seasons passing- I have always wanted to take a photograph of the same thing in the different seasons. So my plan is to keep showing the photo from my log-shed/tractor garage showing how the seasons change- as long as I keep working on the tractor! Plenty of summer rain so far! :( Not looking forward to the 3 foot of snow like the last 2 years.


So once I had wiped off all the dust and dirt off the surfaces, I got to work with the primer. The primer paint is going well. I give it a good shake and stir and it goes on nicely. I initially bought 10 litres, in 2* 5 litre tins. I am probably a third through of the first tin- so I am estimating 10 litres should do the whole tractor.

I would of preferred to get the spring and pin off before doing this section, but the damp weather really does corrode the exposed metal surface quickly, so am happy painting round the section that needs work, the recovering once complete.

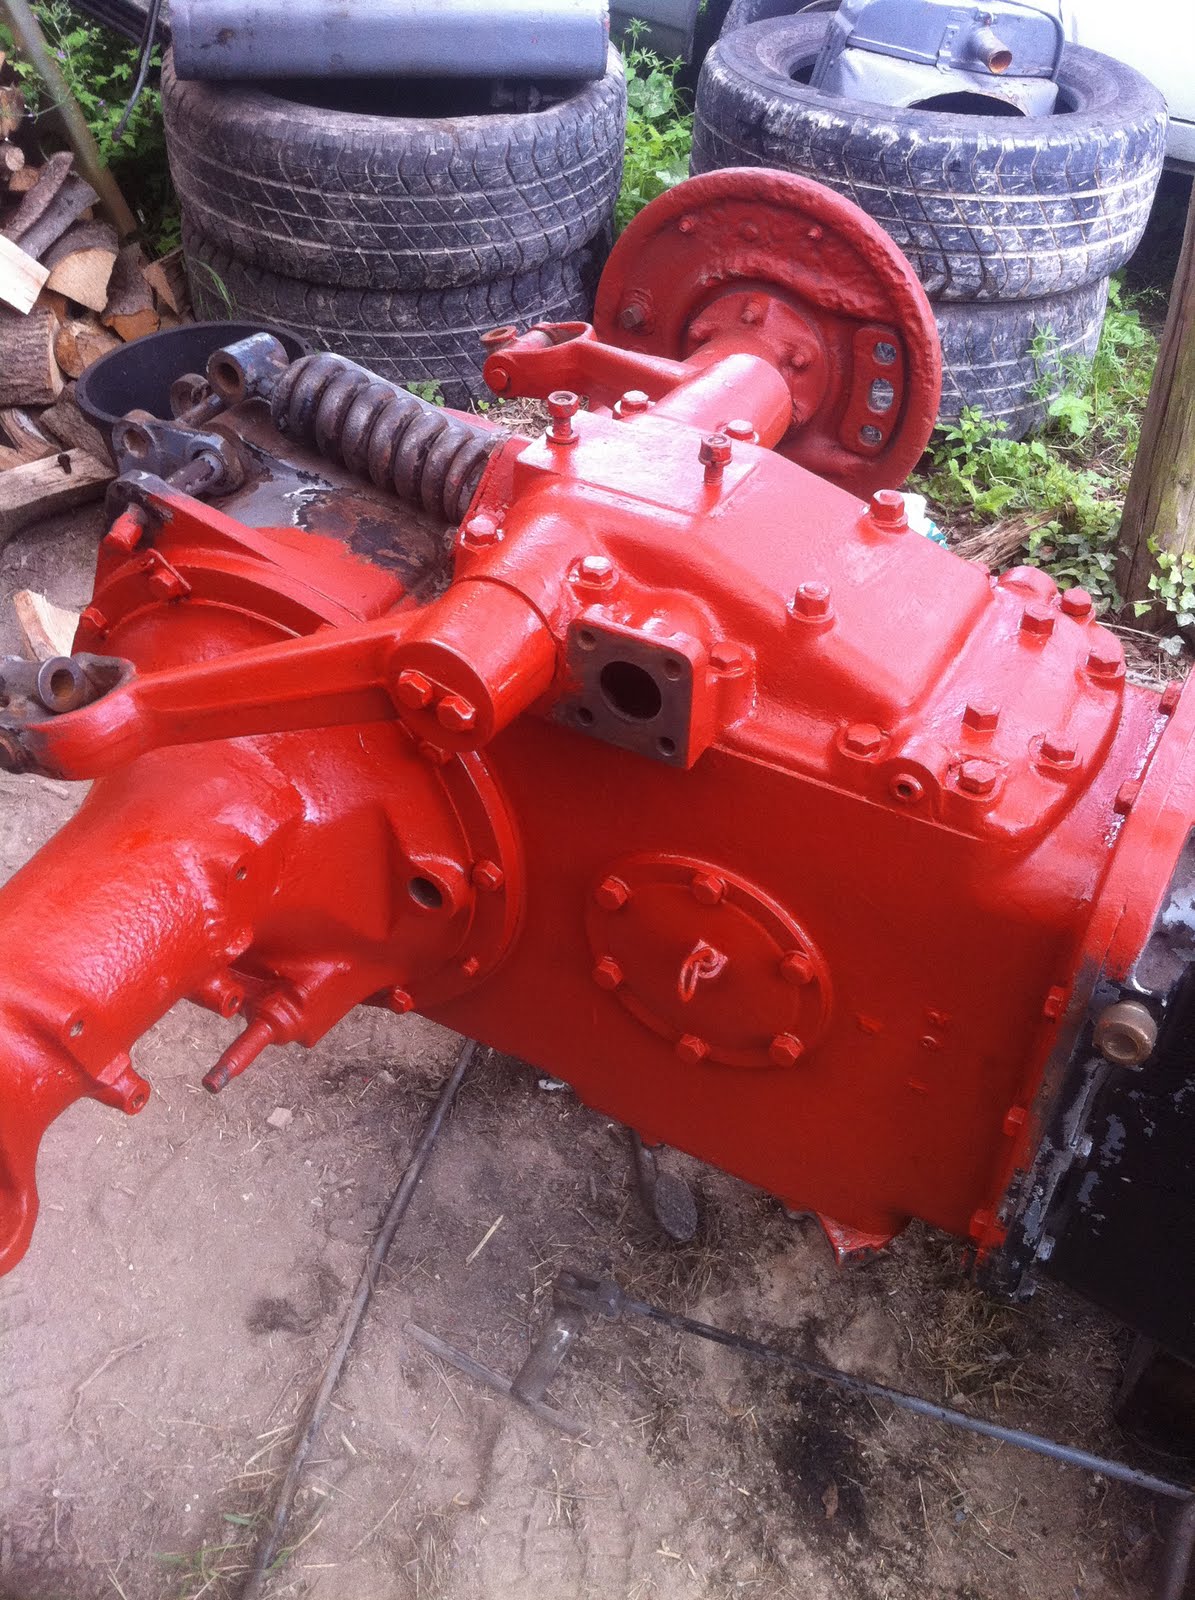
You can see the completed paint below. It just shows, that once you get a single even colour on an object, you get a true idea of its shape. The gray/black/dirt colour previously is like a camouflage. The colour mess doesn't give you an idea of the true shape of the tractor! If you haven't read previous posts- the red oxide primer is a protective/rust eating paint layer. Once all the tractor and parts are primed, I will spray the whole tractor in fergie gray.


I also slapped some primer on the brake drums. I will clean up the surface area that does on to the wheel- but I wanted to make sure it was totally covered.


I have ready some horror stories about cracked tractor bodies. It has been a niggling worry in my mind about the milky oil in the back of the tractor. However during the cleaning up, I have found no obvious problems. Does anyone know where they usually go, or where to look top see if there is any cracking? I have looked around the welds and sections and there is nothing that would suggest it is cracked. I am hoping the milky oil was due  to the damaged seals etc in the PTO and around the seat area.

You can also see the pitting, in the rear wheel hub on this side. It is pretty bad, but I see it as character! I am really focusing now on keeping cost down and re-using where required. Based on the condition of the nuts and bolts I stand little chance of getting these off cleanly, without cutting them.

I did notice that there was a layer of rusted metal on top of the flat section that connects to the wheel guard. The grinder could not remove it, and I thought it was a rusted layer. However, I got the hammer and chisel to it, and managed to chip it off leaving a nice flat surface. I guess it is a rusted layer fused to the axle by the pressure of the retaining bolts. I'm glad to put this effort in to clean it up. Even though it will NEVER be seen, it is important to me that I get this right.


The rain was coming down heavy as I finished off. So I retreated, and returned an hour later to see if there was any dripping rain on the paint. Fortunately not, and the paint is drying nicely. I have so say that I am really pleased with the outcome today! If I can get the whole tractor back to this standard, I will be pleased. It isn't perfect, but it's good- and it will have another 50 years of life in it!


So, jobs for tomorrow:

-- Remove the rear pin
-- Remove the spring
-- Prepare and prime the brake linkages
-- Prepare and prime the PTO cover
-- Prepare and prime the wheel hubs
-- Prime the underneath section
-- Prepare and prime the seat connection and seat

Anytime I feel like it, I am going to have a go at grinding back the rear wheels and prime them up.

-- Order a hydraulic lever
-- Rebuild the brakes and put the drums back on
...

ahh.... the list is never ending

maybe jobs for the next few weeks/months! :) Do not underestimate the amount of work required!

..and we still need to test the clutch, somehow.

Monday, 13 June 2011

deadlines

I have so far avoided setting and deadlines on doing/completing the tractor.

I did want to get it running by the autumn, so I could make sure it was 'sealed' and protected before winter. I am really enjoying the process. However I have been informed that there is a Ferguson club Chiltern tractor run in May 2012.

The deadline is set! I need a reliable, sound tractor by may next year! It's a good job i now have electric run to the log shed- I'm going to need lights!

me looking very dirty!

How do I end up so dirty?

It must be the grinding!

I will post some 'nice' pictures of my nice overalls at some point!

things are starting to go back together!

Both dan and I had been mulling over the clutch mistakes at the weekend. So we were raring to go this evening!

The first plan was to get the tractor back together- after struggling with it so long on the weekend- with fresh bodies and minds we had it wobbled back together in about 20 mins. The main problem we have, is that we don't have a nice flat surface to work on. So the trick seems to be jack the engine up slightly higher, then wobble in each side a mm at a time. Very soon we had the bolts in and had the engine and tractor body tight together- all good. 

We got the clutch pedal adjusted by loosening the pedal, then turning the square bolt that is connected to the spring loaded thrust plate. Then adjusting the pedal so it is a quarter inch off the top bumper. Once done, the clutch pedal had a nice feel to it.

**We still have to test that this is all working before we construct any more- if any one has any clear test, please advise!

Dan said he would like a photo with the tractor. We are over a 1000 views on the blog, so he wants to be propelled to global internet stardom! To be fair, without Dan, there is no way I could be progressing as I am! No amount of money can buy the benefits of experience and friendly contacts! He did pull a rather camp pose when the camera was on him though! :)


Once the tractor was back together, the idea is to clean up and prime the front axle. The whole front end is badly corroded and oiled up with dirt. I don't want to replace the whole front end, as this can be done easily once the tractor is in good working order. So the plan is to grind out the rust and start cleaning up the components. I have noticed, especially with our rather wet summer, that exposed metal corrodes quickly. In line with my grind and prime plan, I cleaned up the front end and the primed the steering rods.

I have a 25 m power cord now and an electric grinder- which has a strange vibration which makes it difficult to hold but it cuts through the rust and dirt very quickly! To get this off, there a number of large bolts round the metal 'dish' part under the front of the engine. These had very little corrosion on them, so easy to get off. We moved the jack to the front of the engine to ensure the tractor wont tip forward- nice and stable.

A key point here- is that when you are buying power tools- get the good ones. Makita are awesome, so are DeWalt etc- as it isn't just about power etc The Makita has no vibration and is a pleasure to work with- the cheaper one vibrates and feels like it is out of control most of the time- it also kicks quite badly- whereas the Makita seems to handle it much smoother and safer!

I am not so sure about the dish design- it was just full of rubbish!


This is quite good, as it has exposed a lot of the front end, enabling me to spend some time grinding and cleaning back before priming. The front is in quite a good condition surprisingly- so I think it will clean up nicely. There is quite a lot of alumnium parts on the tractor, which I am still trying to work out why there is no 'bubbling' where the alu meets the steel. On my old land rover- especially around the window frame, there was a lot of bubbled corrosion. I go to work with the grinder cleaning it all up. There is no rushing this though, and am focusing on a small part at a time.


In the meantime, at the back of the tractor!

When I got the tractor, the PTO was working fine, however when we took the PTO cover off for the first time, there was a lot of milky oil came out. It looked like the PTO seal was badly corroded. The seal was perished. by removing the 8 bolts on the back of the tractor, the PTO shaft pulls straight out. The shaft was in great condition- obviously as it seems like it is submerged in oil in the back section of the tractor.

To replace the seal, the whole PTO section needs to be taken apart. This involves removing two circlips and tapping the shaft out of the rear housing. Once complete we knocked off the old seal- taking care to protect the bearings. Once removed, the PTO needs to be re-built and the last thing to go on it the seal and the small outside circlip. We have all this back together- however the seal needs a little more tapping.

As always, we dont have the correct tool. When the manual says we need a special tool, I ask Dan two questions:

-How big a piece of wood do we need?
-Which hammer should be use?

It always seems to work!!! Thankfully we are working in a log shed, and have a big box of hammers. Lots of 'special' tools!


As you can see below, the new PTO seal is going on nicely- just a little bit more tapping required.


While Dan was tapping and 'playing' with the PTO, I cracked on with the priming of the steering rods.

One awesome deal I got this morning, from Axminister Tools- was a 36 pack of paint brushes for 11 pounds! What a great deal, makes using and disposing of the brushed much easier. Axminster in High Wycombe is an awesome tool shop. When ever I go to Screwfix, they never have what I want in stock and the people who work there are just 'operators. Axminster- so far, have had everything I have needed and always have skilled, experienced people to help out!

http://www.axminster.co.uk/

BE CAREFUL in Axminster though- when you go in to innocently have a look around- expect to come out with bags of stuff and an empty bank account!

I grinded back and primed up the rods, and also copper greased the ball joints as well as copper greasing the tractor areas where these connect. I need to grind and prim the pedals that retain these ball joints to the tractor- I will do this later in the week using the battery grinder as it is so much more precise.


Whilst I had the paint out, I finished the rear left axle. Cleaned it up and primed it nicely. I have lots of parts to do before they go back on before the spraying. I am getting much more confident with the grind and prime technique. Despite being a little tractor- there is so much to do! One good thing is that I got a quote for sandblast and painting the rear two wheels for around £400- so now I think I will be able to do this myself...

By now, we had been working on the tractor from say 6pm-9pm. 3 hours is a good stretch, I think after that you need to be careful you dont get tired and pissed off- especially on a week night. So we decided to test the clutch..


So good news and maybe not good news. We ran a number of tests- although i'm not sure about the results.

The plan was to turn the engine using a spanned and turning the front crankshaft. The good news was that when we engage the PTO, the PTO turns with the engine. Does this mean the clutch is working? I think YES... As it means the engine is connected through to the 'drive' shaft?

However..

When we put the tractor in gear, and turn the engine- the rear wheels don't turn? I'm not sure that the tractor is actually going into gear, or not sure whether the wheels should turn.. They don't. As the PTO is turning it must be connecting through- so the wheel issue, is not worrying my TOO much at the moment.

At the last minute I decided to have a bash at getting the seat off. This had been stuck on since I got the tractor- stuck solid. The trick is getting a socket on to the bolt! There is no space to get the socket on and the nut was ruined. I pushed a socket on and just tapped it and tapped it on to the nut with a small hammer. Once it was on solid, I got the socket lever on and put on our super leverage- 5 foot scaffold pole on the socket wrench! Moved easy! Got the seat off- awesome, again it means getting to the tractor for cleaning it up is so much easier.

Of all 'physics'- leverage is my favorite! :)


As usual, at the end of the day I was filthy! Kasha took some photo's, which if suitable- I will post up. Dan manages to stay clean, I end up filthy. I guess he takes all the easy jobs! To fix this problem, I have decided to start wearing my tractor overalls. Nerdy i know- but practical! I got some nice Deere ones!


So it has been a great day- lots of problems fixed and good progress on the base priming coat. i just hope that the clutch is working as it should - and I need to work out how to be 100% confident in this, as I would find it difficult to put it all back together and then have to take it all apart again!

Next, is grinding and priming back- with a view to getting the front end back on reconnecting the streering. We also have to rebuild the brakes and get the brake drums back on, and there is obviously loads and loads and loads and loads more.

clutch

Spoke to the guys who I bought the clutch off and they have confirmed that the clutch needs to have the metal plate removed.

They said that the clutch, with the plate is used for a MF 35X, and to take it off on the TE20. So good, am looking to progress the re-connection this evening. Typical that the great weather comes back on a Monday- when I'm at work and that the weekend has torrential rain!

I found this picture of the great and inspirational Fred Dibnah- with a very useful/multipurpose tool!


Sunday, 12 June 2011

tractor re-connection, re-split and ....

We started early, with the plan to get the flywheel and new clutch on- and then reconnect the tractor. The rain started early- so all day we were trying to work in cold, wet, sideways rain.. Quite frustrating and annoying when it runs right down your back!

I'm pretty annoyed at the moment- we haven't made any where near as much progress as I hoped- and made some pretty school boy errors. This has meant we have wasted half a day. Let me try are share some of the errors- in the hope that if you are doing this, you can avoid!

With hindsight, the bolts that held the engine to the tractor should have been replaced, as the ones that were on there were a hotch-potch of set screws and nuts being used as spacers on longer bolts. As described in the previous post, the flywheel has been completed nicely. This went on easily- there is a small metal plug that allows the flywheel to sit correctly. We positioned the flywheel on and bolted in the 6 retainer bolts with the metal strips. These prevent the bolts from loosening, where they were damaged, I snapped the ends off to prevent them from floating around in there.

You can also see in the below picture the new bearing and seal in the flywheel.


To tighten up the metal plates, we used a metal chisel and hammer. The flywheel bolts were torqued up to 100 lbs.


So, this is where the clutch alignment tool is used! Thank you Arthur for letting us borrow yours. This tool is basically to allow you to hold the clutch plate in place and allow the clutch bell to be positioned around the place and bolded into place. The correct end is used to fill the bearing and have a tight fit. This went well, and we got the plate in place. The new clutch plate looks great!


Below the first stage, where the clutch plate is held in place with the alignment tool. It is important that the clutch plate is put on the correct way. The central part sticks out farther, as can be seen below. This allows the clutch plate to fit close to the flywheel. It is important to make sure the alignment tool is tight against the plate, and tight in the central bearing or the plate will slip a few mm, and then the housing will not fit over the plate.


Those of you reading this who know what you are doing, I am sure will see our mistake! We fitted the housing and tighten the bolts to 28 lbs torque. The alignment tool pops straight out no worries. At this point I was thinking- jobs a good un' and was lining up for a nice cup of tea. However, this is where it started to go all wrong.

We copper greased the splines in the clutch bell housing and on the clutch plate itself. Then fitted the new gasket around the tractor. It put a few dabs of copper  grease around to hold it in place. Good news that there were and are no oil leaks no we have replaced the seals inside the tractor.

So once back on we will of fixed the starting problem and the oil leak!

The weather was still horrible, and was starting to get a little impatient at this point. There is a moral to this somewhere! I think it is probably, if you feel you are rushing, you should stop and time some time out. We instead pushed to get the engine on to the tractor. The engine was still being held up by the front wheels and the trolley jack.


With a good 30 mins of wobbling and getting the bolts in, and using temporarily long bolts we got the engine and tractor back together! As we are not on a solid concrete floor, and the work area is on a slight angle getting them lined up is a nightmare. So to get it all connected back together was a massive relief! Some pats on the back, we thought we were home and free :)


At this point, we decided we would just check the turn over of the engine, by using a adjustable spanner on the front of the engine. It was solid, and wouldn't move. When we looked to make sure the engine was out of gear, we discovered that the clutch pedal was solid up against its top position.

As always with these tractors, to do one job, you need to do a number of others- so the fun started.

To get the clutch pedal off, the right solid brake linkage has to come off. This however is connected via a toothed clamp, which was totally corroded together. So I worked on this with the wd40 and hammer. Eventually getting the linkage off- this gives socket access to the clutch pedal connection.

I loosened the clutch pedal and the square connector to the tractor inside went loose. We realised we had a problem, the clutch pedal was not connecting to the clutch- all that was holding the clutch pedal up was the retaining springs over the bearing inside. The realisation that we were going to have to open the tractor up again was dawning on us. :(

So, it was back to square one, the wobbling/pushing/edging the engine back on to the tractor really takes it out of you and contemplating doing it all again was not a great motivator!

30 mins later...

The tractor was split again and we had the clutch housing out.

Looking at the clutch and comparing it to the old one, it looks like the metal circle in the middle is packing material. On testing, we couldn't get the metal ring around the splines on the gearbox shaft- explaining why the pedal was loose and the springs and bearing were not connecting with the clutch itself.

So we either have the wrong clutch or it is a temporary piece. I had no patience left by this point- so unleashed the pliers and took off the retaining springs and took the metal ring off. The new clutch then looked exactly like the old clutch- so i was feeling more confident. We then went through the alignment process and when it came to fitting the housing on- it was not run flush with the flywheel! arrggghhhh!!!

It seems like the metal part is to hold the clutch closed to allow it to be connected to the flywheel- then it should be removed. I think! Please - if anyone can confirm this theory- please do ASAP!

We got the rest put together and then started to line up the engine with the tractor- at this point we were both too tired with pushing and shoving. So we have left it in the current state- an hour of wobbling and we should have it back together. However if anyone can confirm the clutch situation, it would be appreciated- I can't face doing this all over again! You can see our retaining pin tool - used to pull it all together!


Below is the offending item!


Its been a slow, frustrating day- but I have learnt a lot! (If I was trying to find a positive side!)

I'm hoping we have it right now, and am looking forward to getting the whole thing closed up.

To make myself feel better I have been enjoying reading the following blog:


There are some details around the original toolbox- so am going to do some ebaying to see if I can find some original parts. I really would like to get the original tools put back together.

Maybe its just the weather, or the bad day- biut completing this project seems a long, long way away. The most frustrating part is that the horrible weather means I can't get out there and make any progress.

Oh, yes- one other thing is that I would like to get a new set of bolts for the engine/tractor connection- some are shorter than others. Does anyone know the list of fixings I need to do this?